Spreadsheets (Excel) Block
The Spreadsheets (Excel) block lets you read, update, insert, or delete data in Excel spreadsheet files directly from your workflow.
Get Spreadsheet Cell Values
Retrieve values from cells in an Excel file.
File Path
Select the Excel file path on the computer.
Range
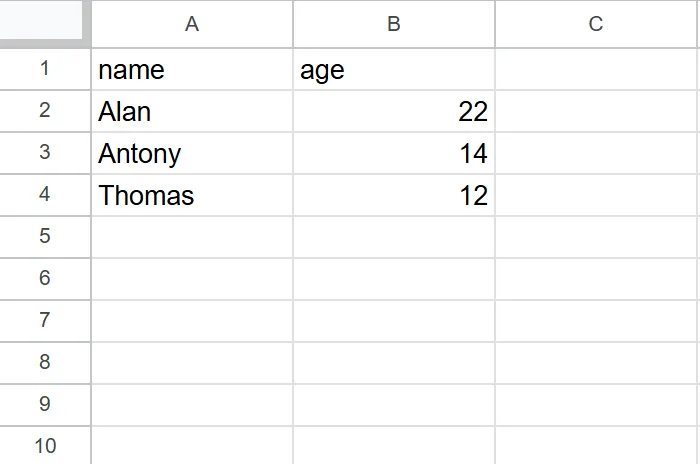
The range of data to be retrieved for use. For example, with data as shown in the image, if the user wants to get values from row 1 column A to row 3 column B, the range will be A1:B3.
In addition, if there are multiple sheets, the sheet name must be added before the range, for example, there are 2 sheets, Sheet1 and Sheet2, if the user wants to get values from row 1 column A to row 3 column B in sheet Sheet1, the range will be Sheet1!A1:B3

Reference Key
Used to identify the retrieved data. This key is used in blocks like Data Loop, Data Export, etc.
Use First Row as Key
Use the first row of the spreadsheet as the object key.
Column Name as Primary Key
If you want to use data precisely matching the running profile you can select this option.
Value as Array
If you want to use multiple data points within the same profile you can select this option.
Practical Examples
Example: Logging into an Account with a Specified Profile
Example
You want to use data from a file to log into an account on w3schools:
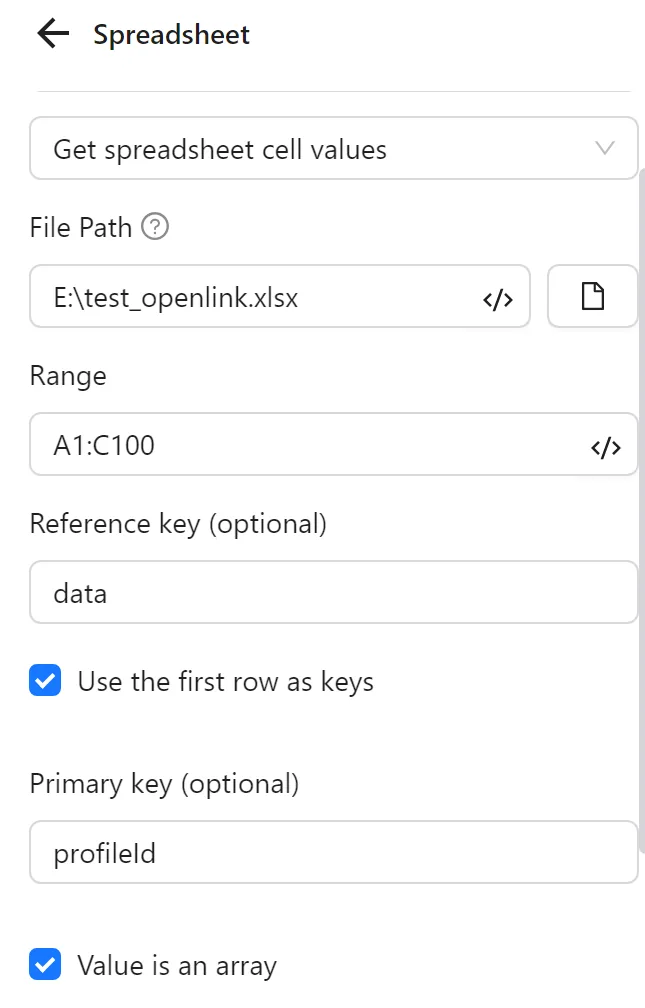
First, you create a data file with columns profileId, email, and pass:

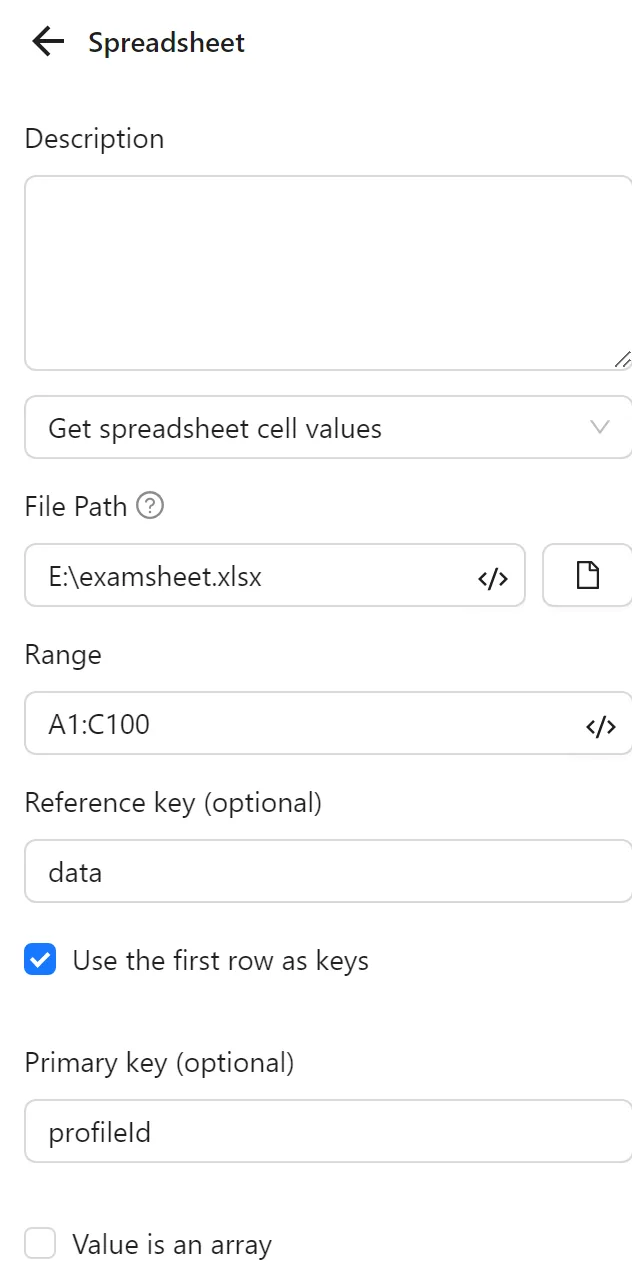
Next, you configure the Spreadsheets node to retrieve data from the file. You set the range to A1:C3 (or A1:C1000 to ensure all data is retrieved if more is added later). You set the Reference Key to data. You enable Use First Row as Key to use the first row as the primary key and select profileId.
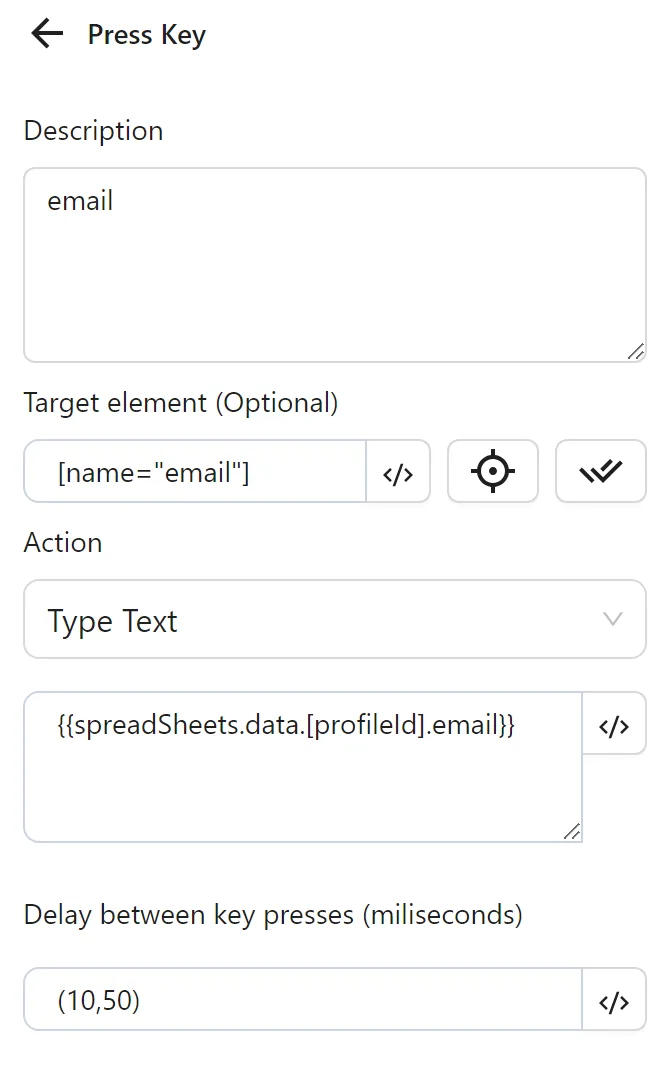
Then, you configure a Key Press node to input the email from the email column. You enter the selector for the email field, select Type Content, and use the expression {{spreadSheets.data.[profileId].email}} (e.g., [email protected] for profileId 15981).
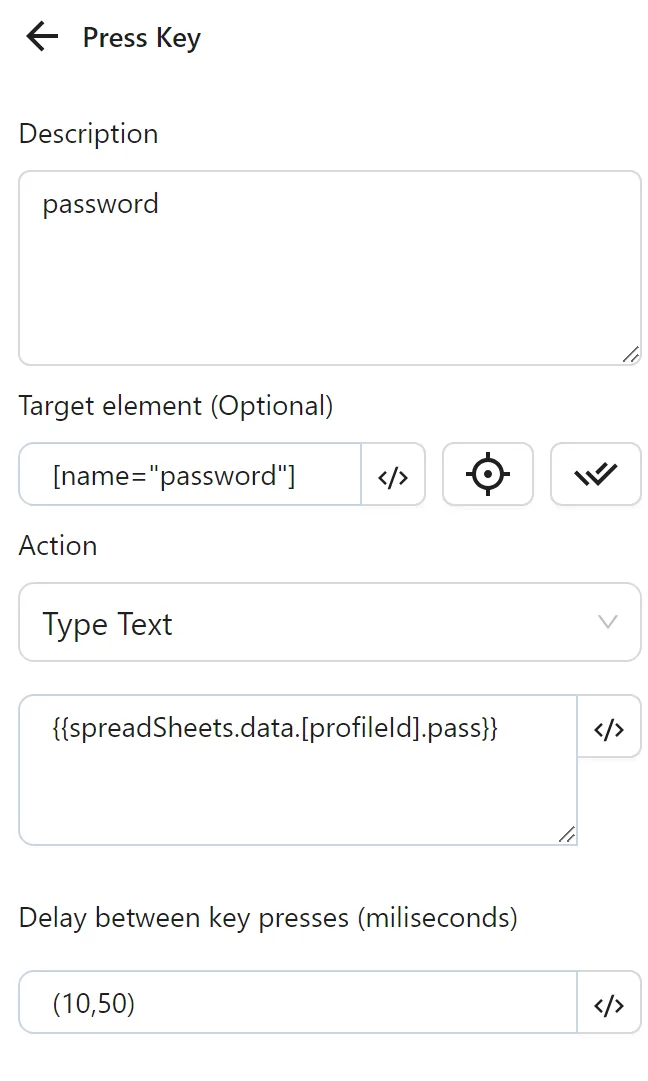
Next, you configure another Key Press node to input the password from the pass column. You enter the selector for the password field, select Type Content, and use the expression {{spreadSheets.data.[profileId].pass}} (e.g., 12euwqdhdae for profileId 15538).
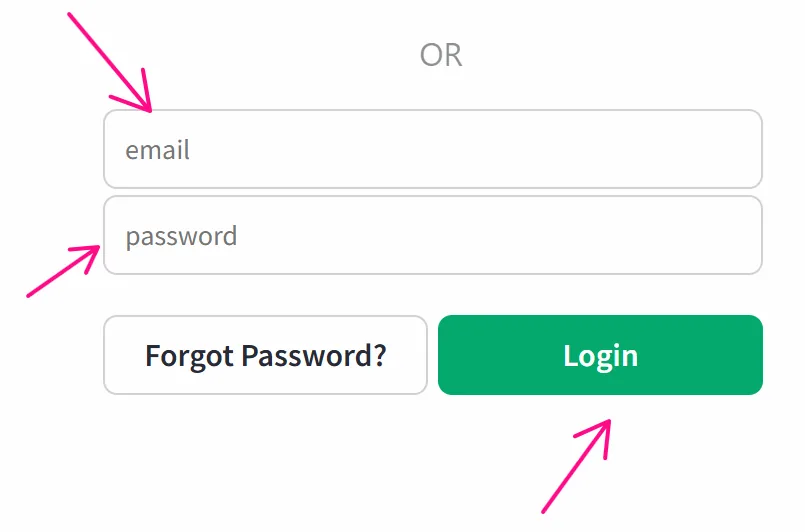
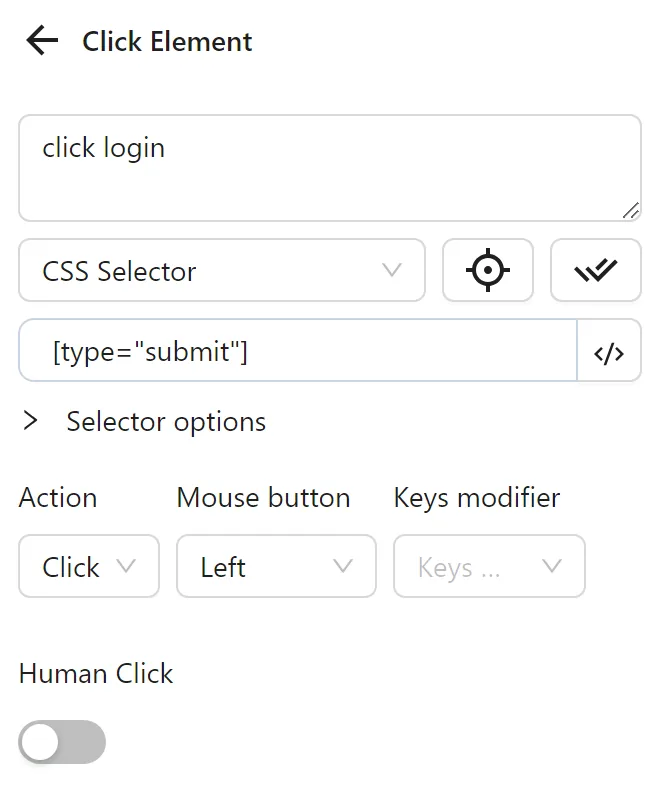
Finally, you configure a Click element node to click the Login button:
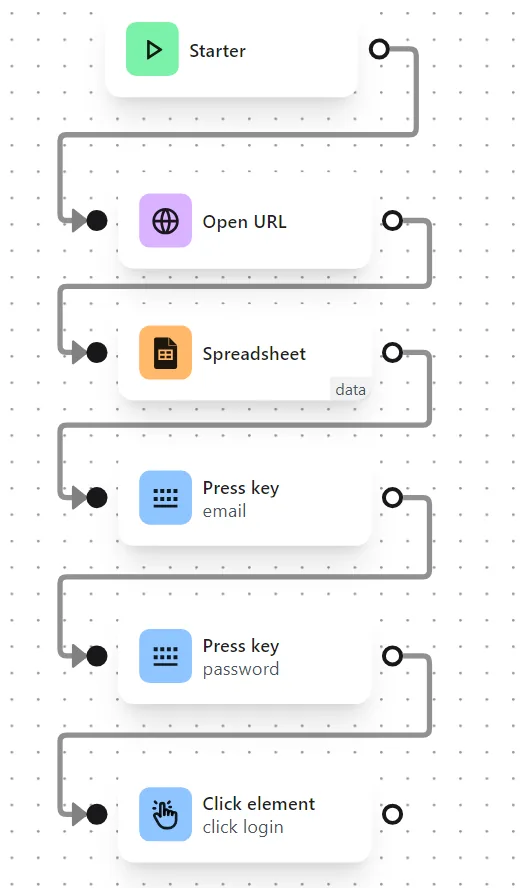
The node cluster looks like this:
When running this cluster, it fills in the email and password, then clicks Login as desired:
Example: Using Multiple Data in One Profile
Example
Here you want to open multiple YouTube video links and perform the action of scroll each video.
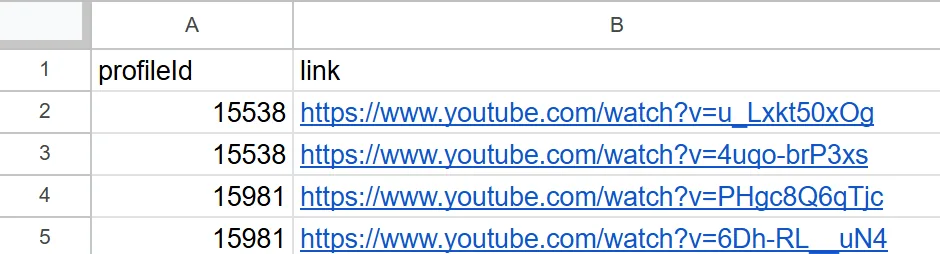
First, you prepare a sheet with two columns: profileId and link:
Next, you configure the Google Sheets node to retrieve data from the sheet. You paste the sheet ID into the Spreadsheet ID field. For the range, you set the data range to A1:B3, or to be safe, A1:B1000 to account for additional data. You set the reference key to data. Then you select Use First Row as Key to use the first row as keys. You choose the primary key column as profileId to match data rows to the profile in use.
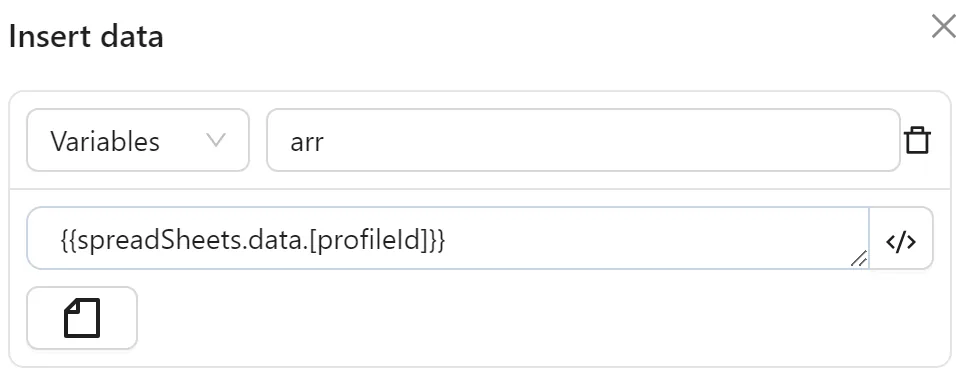
Next, you select Values as Array. This makes the data for each profileId an array of values:

Then, you use the Insert Data node to assign the array of values for each corresponding profileId to a variable arr:
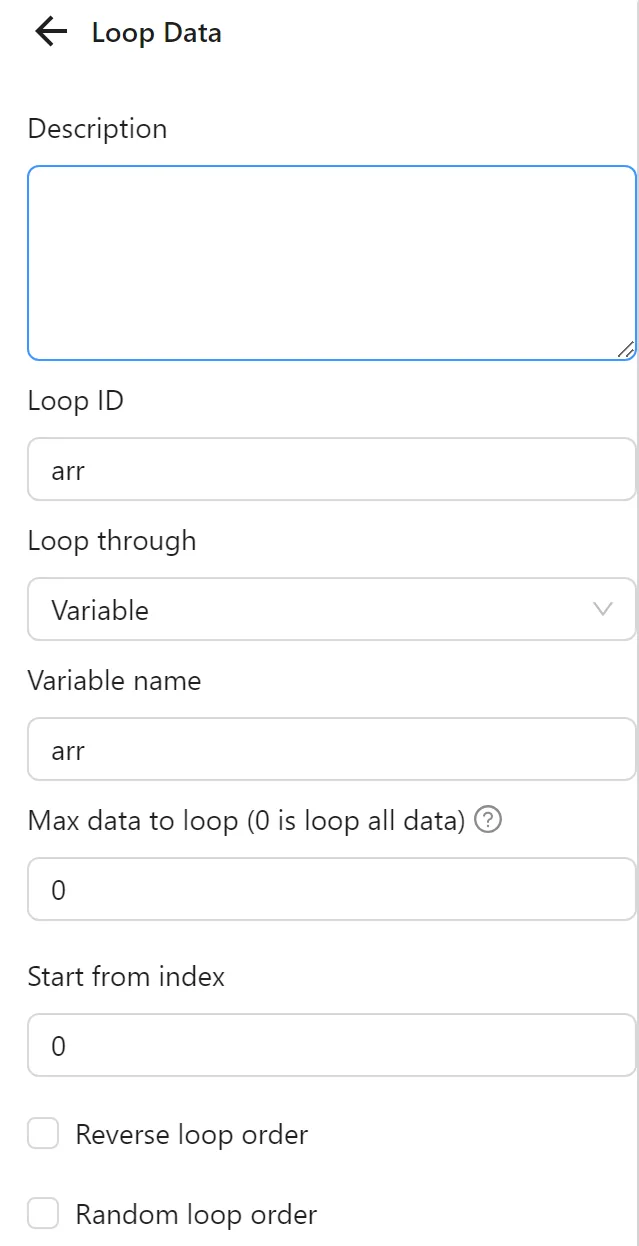
Next, you configure the Loop Data node to iterate through the arr variable:
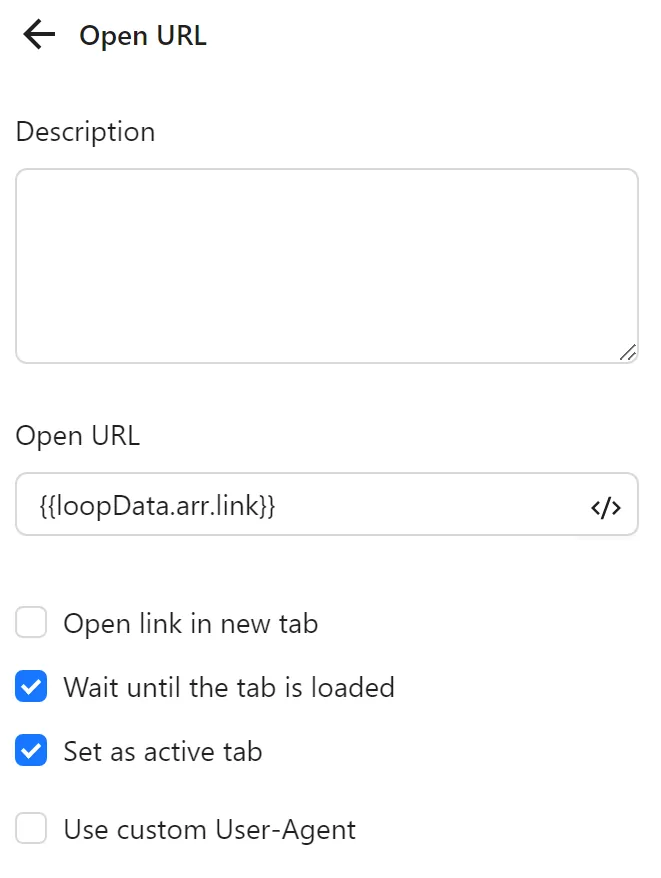
Then, you configure the Open URL node to use the value from each iteration of the Loop Data node in the New Tab URL field. Instead of a regular URL, you use the expression to retrieve the value for each iteration: {{loopData.arr.link}}.
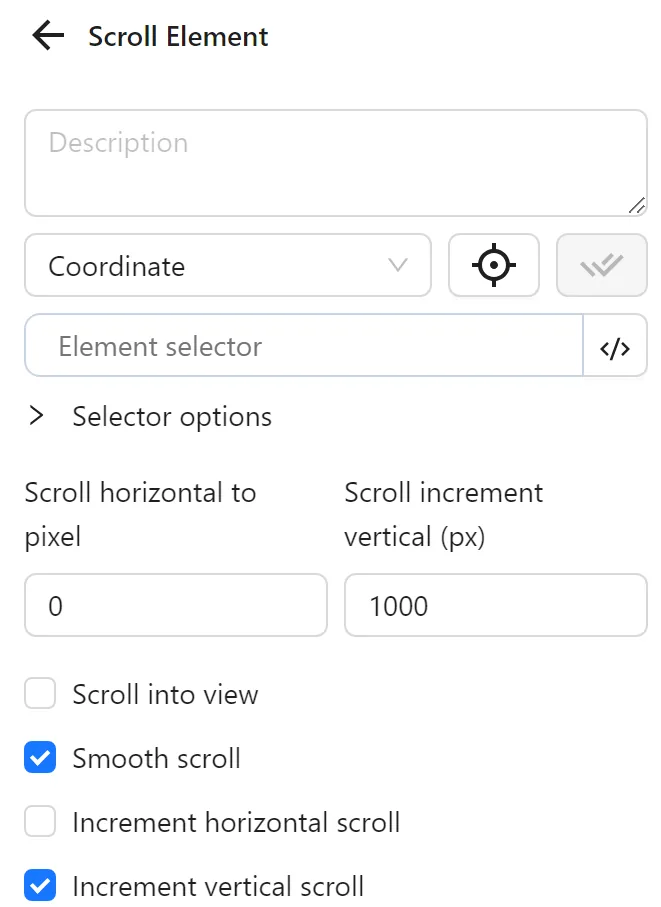
Next, you configure a Scroll element node to scroll the newly opened video:
Then, you use a Pause node to wait 1 second before opening the next link.
Finally, you use a Stop Loop node to mark the end of the loop.
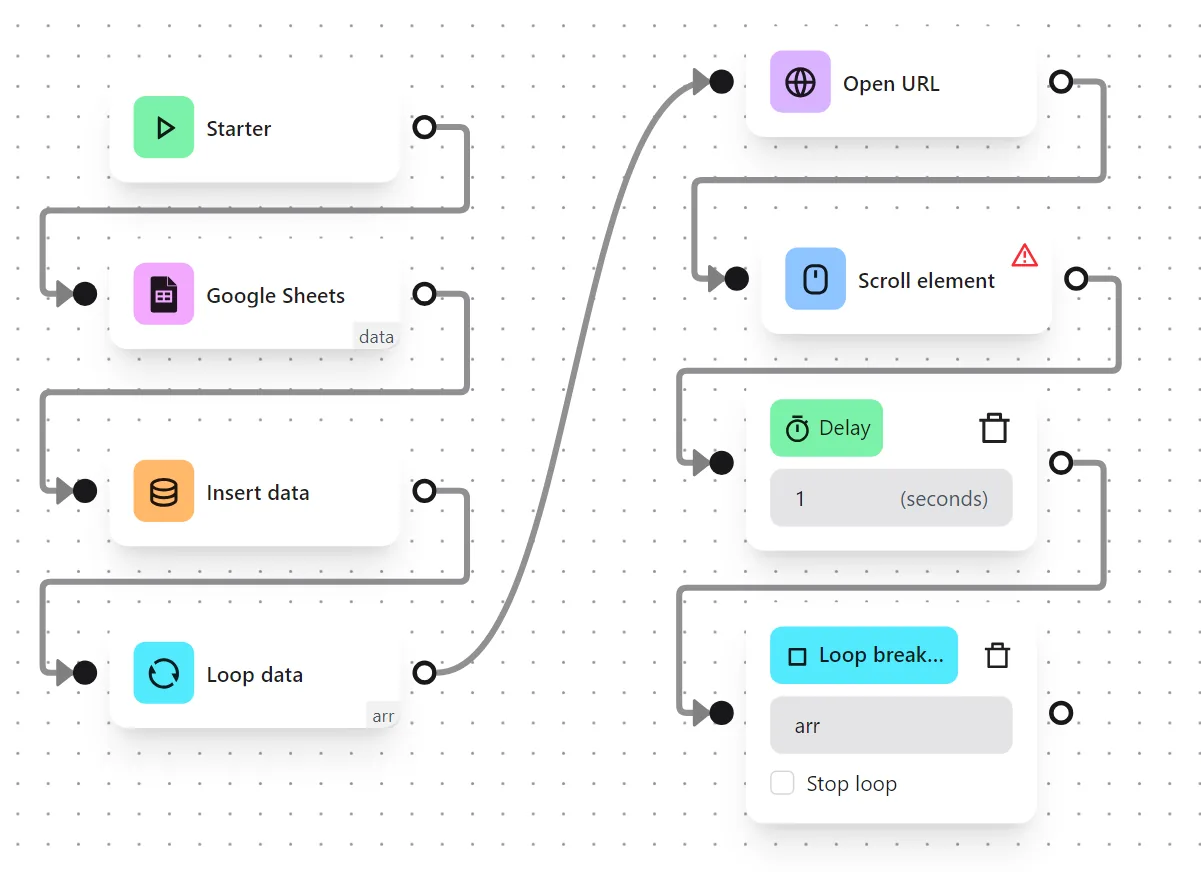
The node cluster will look like this:
When running, the workflow opens the links corresponding to the profileId of the running profile and likes each video:
Update Spreadsheet Cell Values
Update the value of an existing cell in a file.
File Path
Select the Excel file path on the computer.
Range
Specify the range of cells to retrieve, update, or delete. The range can be defined using A1 notation such as Sheet1!A1:B2, A1:B2, or A1 (a shorthand for A1:A1).
Data Source
The data source to update the spreadsheet, defaulting to a Table. Data within the range will be overwritten. The number of overwritten cells depends on the data source.
- Specific Value: The entered data will be written to the first cell in the selected range. The value can be a number, string, or boolean.
- Table: Use data already inserted into a table.
- Write Key to First Row: Include both column names and values in the cell.
- Custom: The input data must be an array with valid JSON syntax.
Practical Examples
Example: Updating Multiple Cells When Running a Profile
Example
You have a data file with 2 columns:
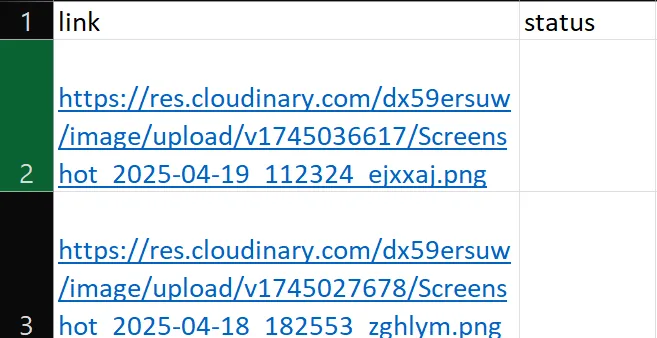
My workflow is to fetch each link, open it, and update the status column to done.
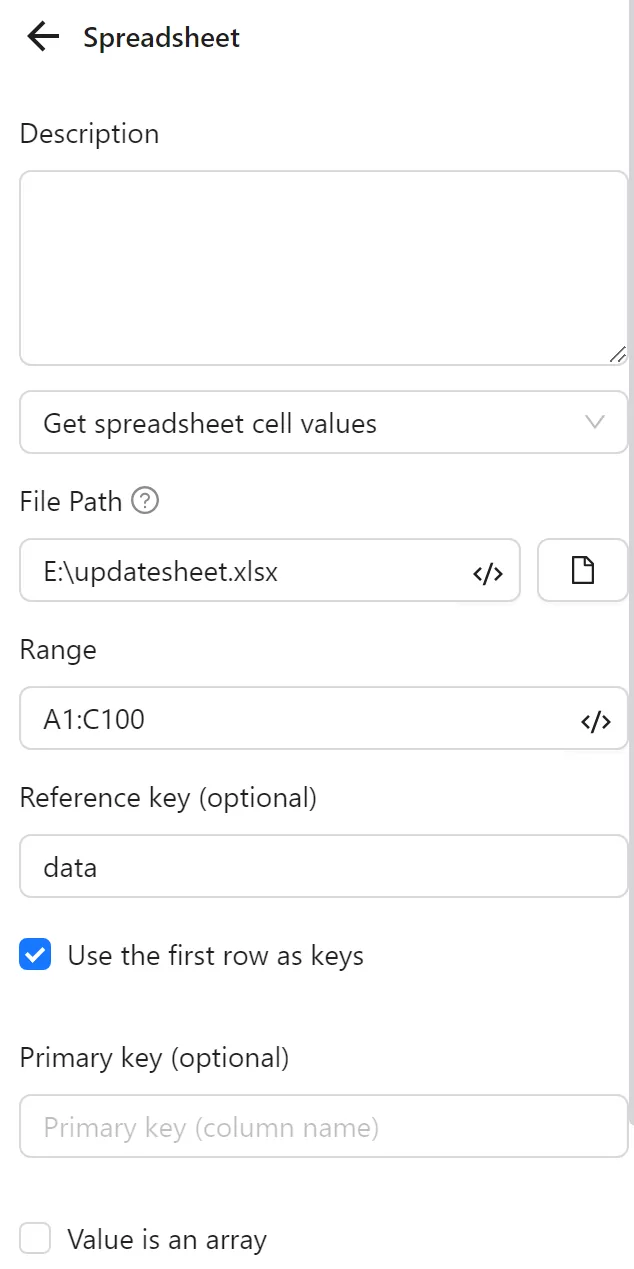
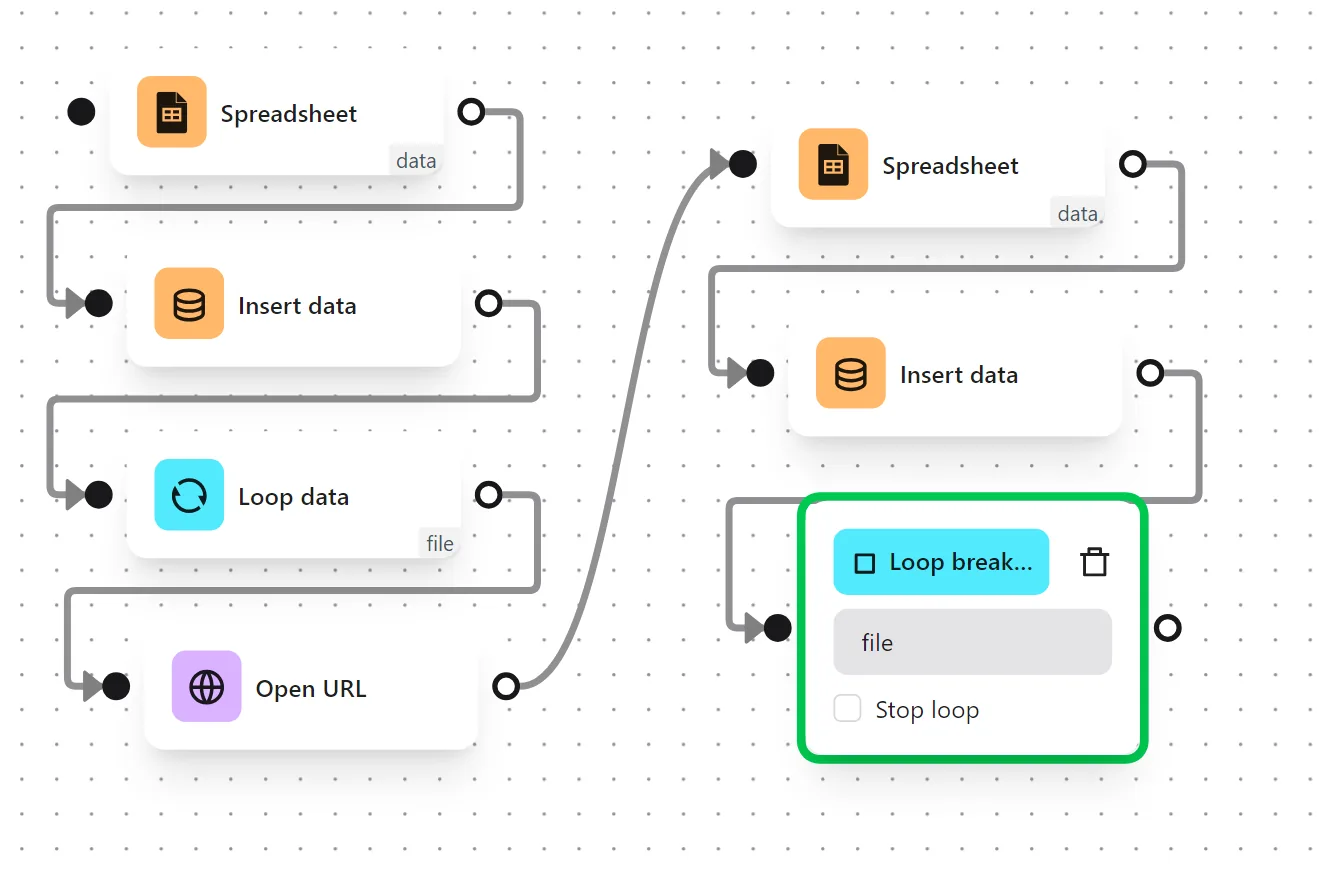
First, you configure a Spreadsheets node to retrieve data from the file. You select Retrieve Spreadsheet Cell Values, set the file path, range to the link column (e.g., A2:A1000), set Reference Key to data, and enable Use First Row as Key.
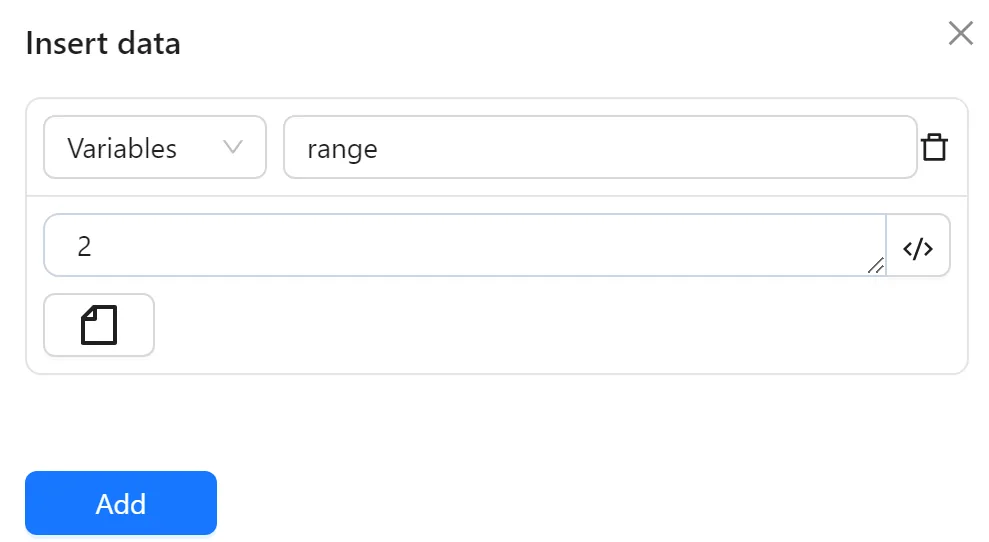
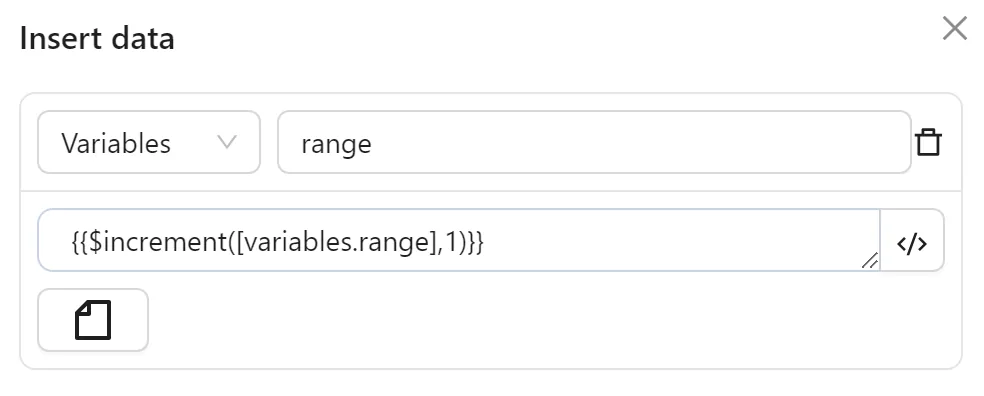
Next, you configure an Insert Data node to create a variable range with the value 2 for use in subsequent nodes:
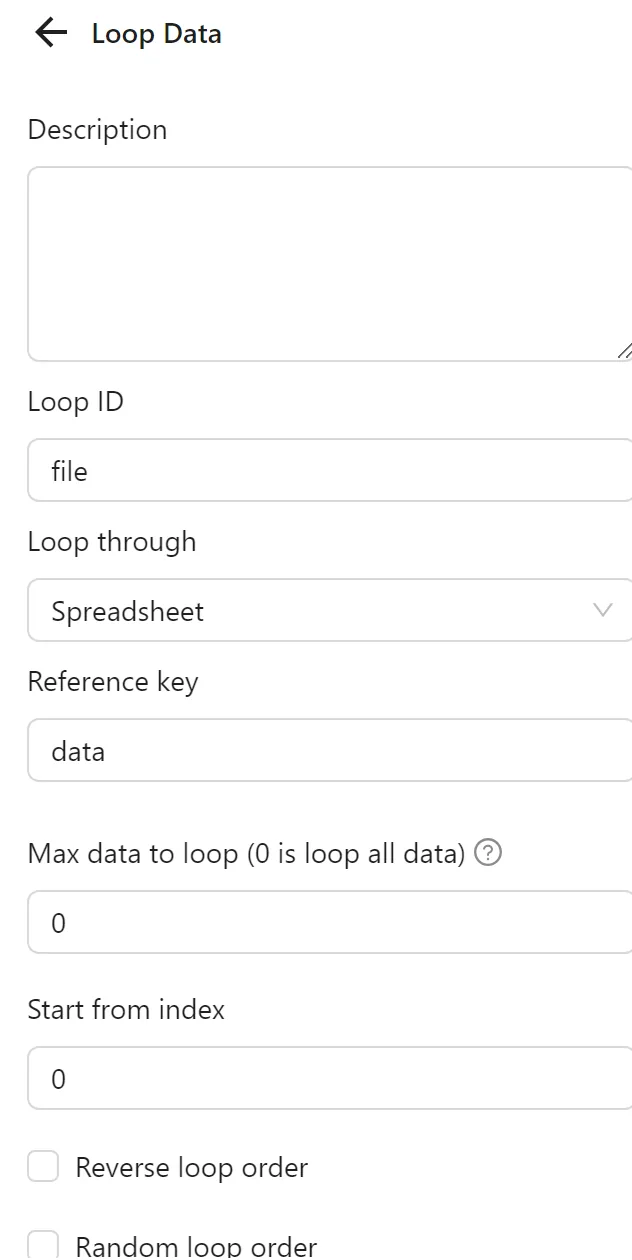
Then, you configure a Loop Data node to iterate over the data from the first Spreadsheets node:
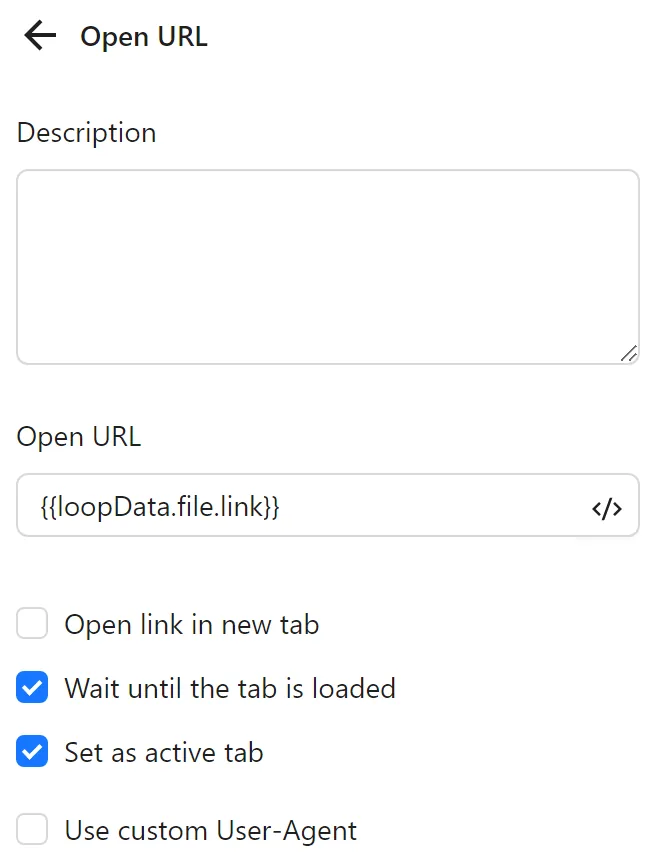
You configure an Open URL node to open the link from the loop:
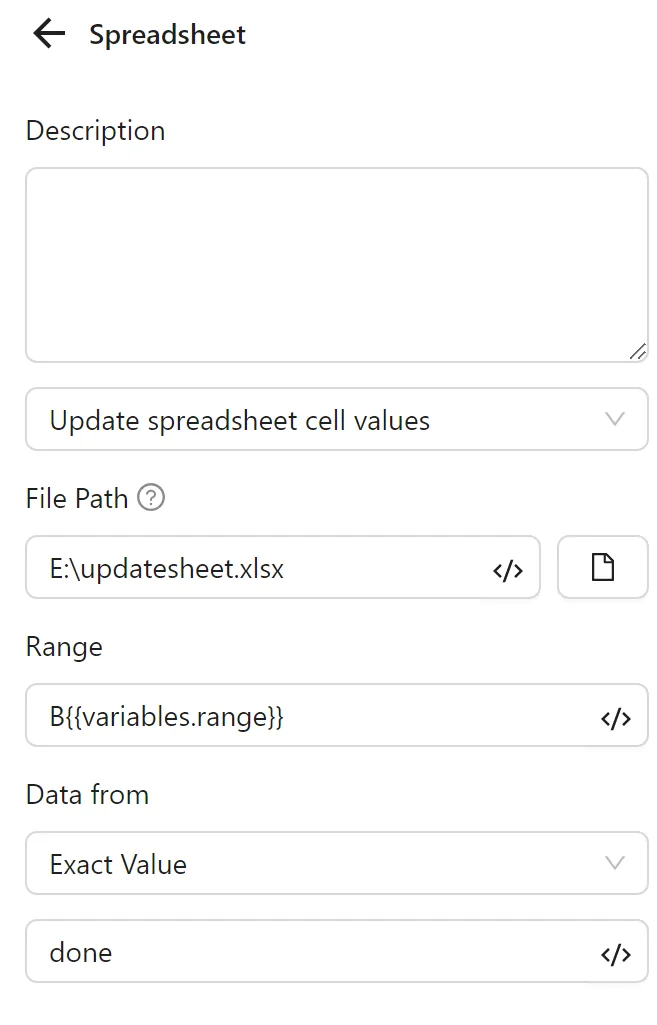
Next, you configure a second Spreadsheets node with Update Spreadsheet Cell Values. You set the range using the range variable (e.g., B2 for the first iteration), and select Specific Value with done as the data source:
You configure a second Insert Data node to increment the range variable by 1 for the next iteration:
Finally, you add a Stop Loop node to end the loop.
The node cluster looks like this:
When run, it opens the links and updates the status column accordingly:
Example: Updating a Cell Based on Profile Run Order
Example
You have a data file with 2 columns:
My workflow is to fetch a link corresponding to the profile's run order (e.g., the first profile opens the first link), open it, and update the status column to done.
First, you configure a Spreadsheets node to retrieve data from the file. You select Retrieve Spreadsheet Cell Values, set the file path, range to the link column, set Reference Key to data, and enable Use First Row as Key.

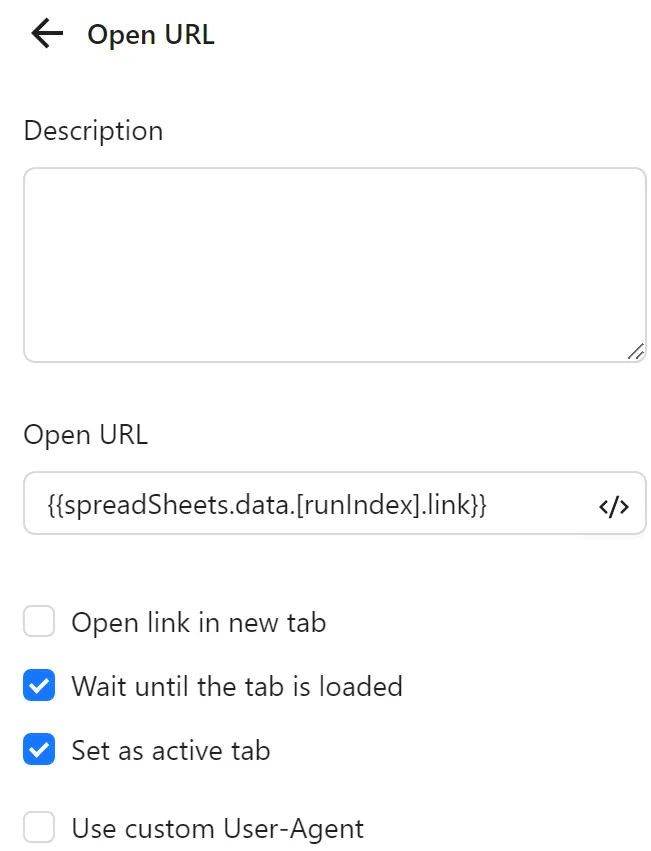
Next, you configure an Open URL node to open the link corresponding to the runIndex with the expression {{spreadSheets.data.[runIndex].link}} (e.g., the first profile with runIndex 0 takes the first row):
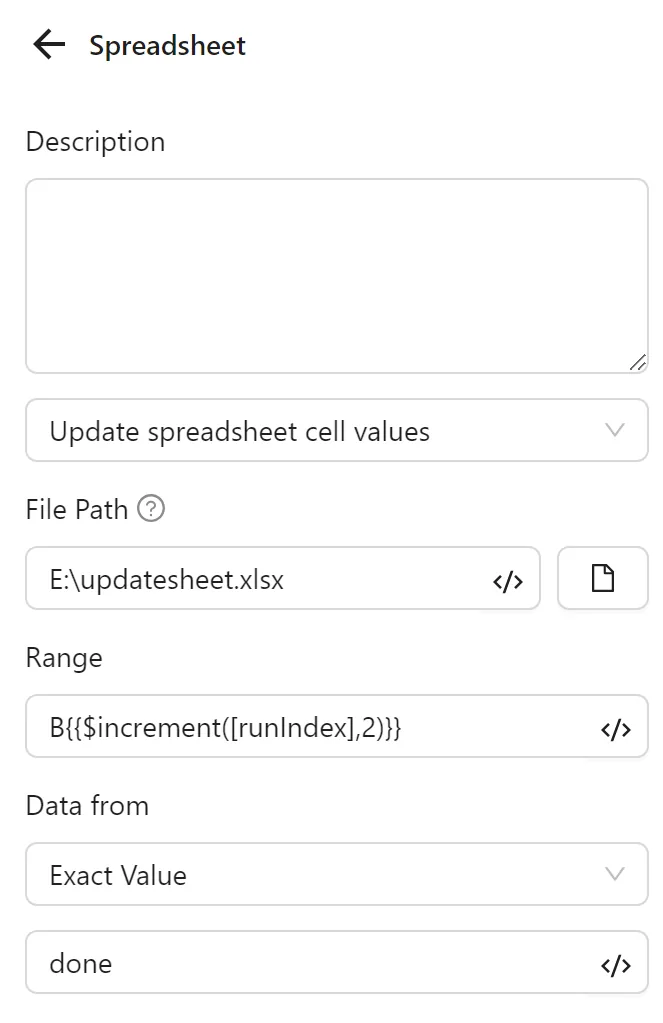
Then, configure a second Spreadsheets node with Update Spreadsheet Cell Values. You set the range using D{{$increment([runIndex],2)}} (e.g., D2 for the first profile), and select Specific Value with done as the data source:
The node cluster looks like this:
When run, it opens the link and updates the status column:
Note
The file must be closed (e.g., not open in Excel on Windows) when running to avoid errors.
Insert or Add Spreadsheet Cell Values
Insert or add values into a cell in a data file.
File Path
Select the Excel file path on the computer.
Range
Specify the range of cells to retrieve, update, or delete. The range can be defined using A1 notation such as Sheet1!A1:B2, A1:B2, or A1 (a shorthand for A1:A1).
Data Source
The data source to update the spreadsheet, defaulting to a Table. This function finds the first available empty row in the selected range and adds new rows there, shifting subsequent rows downward. The number of rows and columns added depends on the data source.
- Table: Use data already inserted into a table.
- Write Key to First Row: Include both column names and values in the cell.
- Specific Value: The entered data will be added to the first available cell in the selected range. The value can be a number, string, or boolean.
- Custom: The input data must be an array with valid JSON syntax.
Practical Examples
Note
The file must be closed (e.g., not open in Excel on Windows) when running to avoid errors.
Delete Spreadsheet Cell Values
Delete values from a spreadsheet based on the selected range, which can be a single cell or a range.
File Path
Select the Excel file path on the computer.
Range
Specify the range of cells to retrieve, update, or delete. The range can be defined using A1 notation such as Sheet1!A1:B2, A1:B2, or A1 (a shorthand for A1:A1).
Practical Example
Example
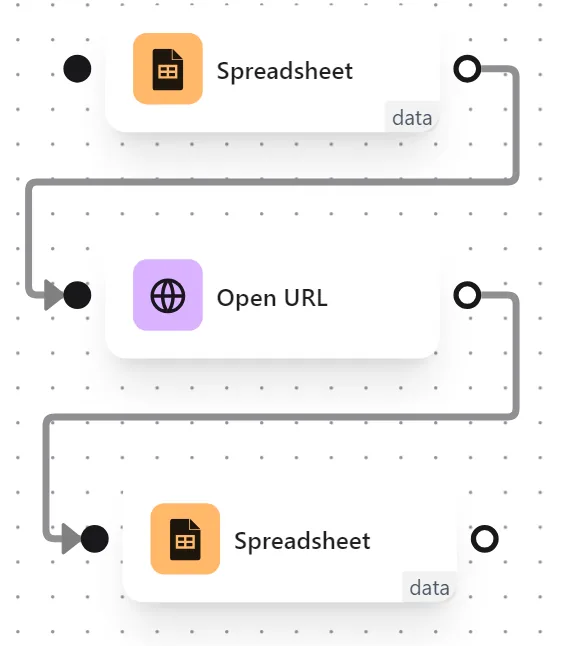
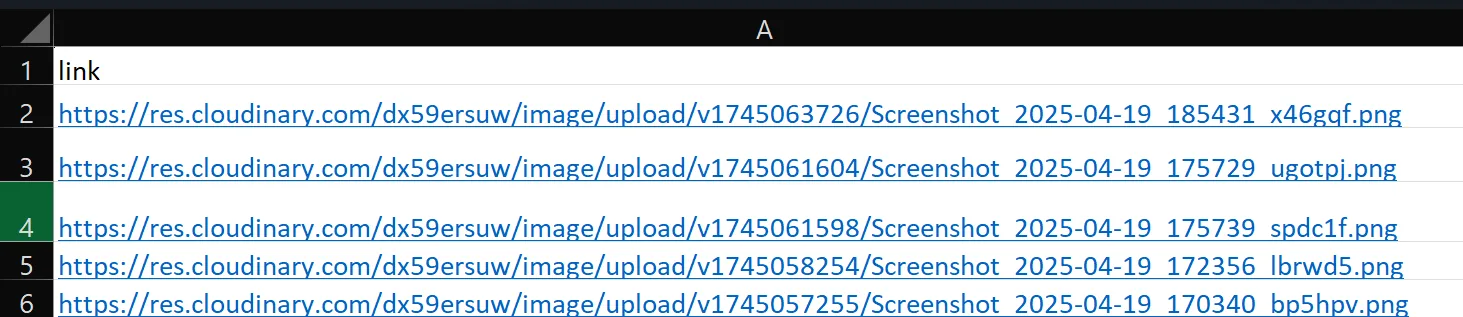
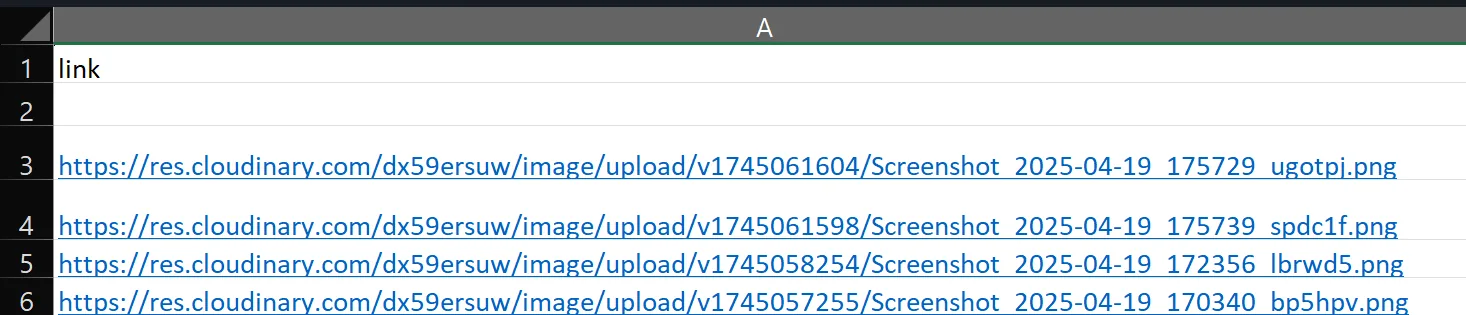
You want to create a workflow where a link from a file is opened, and after opening, that link is deleted from the file. Each profile opens and deletes one link, then the workflow ends.
First, you configure a data file with image links:
Next, you configure a Spreadsheets node to retrieve data from the file. You set the file path, range to A1:A1000, Reference Key to data, and enable Use First Row as Key:
Then, you configure an Open URL node to open the link using the expression {{spreadSheets.data.[runIndex].link}} (e.g., the first link for the first profile):
Finally, you configure a second Spreadsheets node with Delete Spreadsheet Cell Values. You set the file path, and the range using A{{$increment([runIndex],2)}} (e.g., A2 for the first profile), which deletes the first link:

The node cluster looks like this:
When run, it opens the first link and deletes it from the file:
Note
The file must be closed (e.g., not open in Excel on Windows) when running to avoid errors.