HTTP Request Block
The HTTP Request block sends an HTTP request to an external API or webhook endpoint. Use it to fetch data, submit forms, trigger webhooks, or integrate with third-party services.
The block includes the following configuration options:
Request Method
The request method (GET, POST, etc.)
Request URL
The request URL address.
Content Type
There are 4 content types to choose from:
- text/plain: plain text format, without special formatting or encoding.
- application/json: JSON data format, commonly used for data transfer between server and client.
- multipart/form-data: represents Multipart form, this encoding type is used when users want to upload data files.
- application/x-www-form-urlencoded: the default encoding type if the enctype attribute has no value, representing URL Encoded Form. All characters are encoded before sending (spaces are converted to "+" or "%20" symbols, and special characters are converted to ASCII HEX values).
Use Cache
Store the returned value when the execution is successful, and in the next run, use the previously returned value instead of making a new HTTP request.
Use Profile Proxy
Use the profile's proxy when performing an HTTP request.
Timeout
The timeout duration for performing the HTTP request, select 0 for no timeout.
Headers
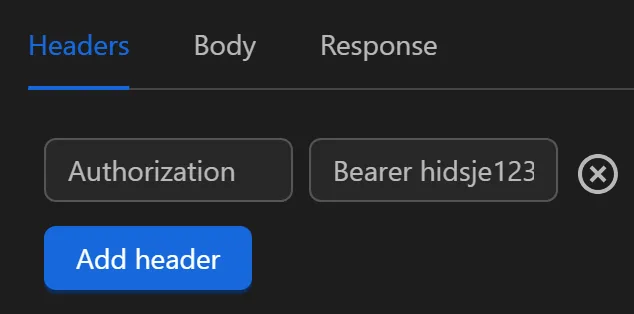
To authenticate when using the API if necessary. For example, if you need to authenticate using a Bearer token like:
Authorization:Bearer hfkasf2938safjkb,bfclsaidfcf,jsacbliwgsbdcjsacsdakhfasjbasdfhfakjsfdbcasdfgasfbasdfhbfcbashdagdkbsajfhgdsb.
You will fill it in the node as follows:
Writing Expressions in Content
When writing expressions within the content to access data such as variables, tables, etc., it's a bit challenging because the final result must be valid JSON. To avoid the "Invalid JSON content" error, you need to wrap the expression in the $stringify function.
Response
After receiving the returned data from the API call, you need to process it for use. This section includes some information to note, such as:
Response Type Select the response data type, default is
JSON.Data Path When selecting the JSON response type, you can configure the path of the desired data. For example, when the response returns this data:
	{
		"status": 200,
		"data": {
			"name": "Prices",
			"values": [
				{ "id": 1, "value": 4000 },
				{ "id": 2, "value": 24000 }
			]
		}
	}
If you want to retrieve the value of the
valuesarray, use the syntaxdata.values. To get the first value of thevaluesarray, use the syntaxdata.values.0.If you want to use all the returned values as above, leave the
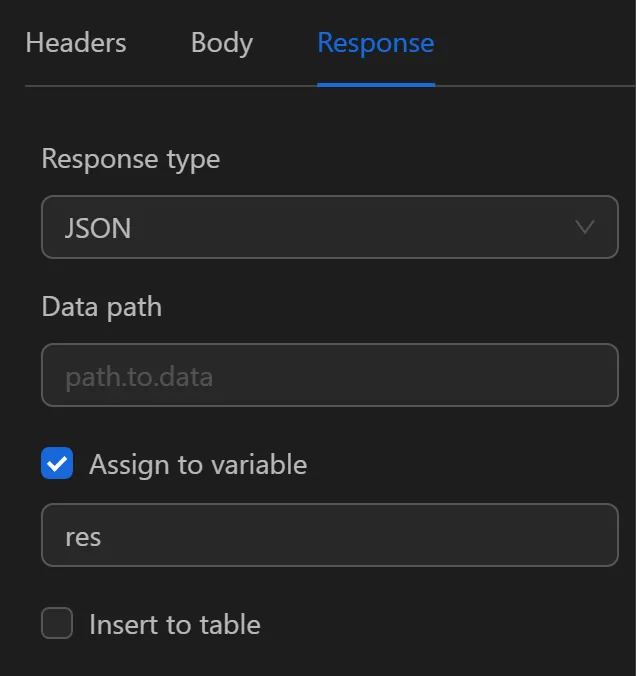
Data pathfield blank.Assign to Variable You can assign the value to a variable.
Variable Name The variable name to assign the value to. This field appears when you choose to assign to a variable.
Insert into Table You can insert the value into a column in a table.
Select Column The column where the value is inserted. This field appears when you choose to insert into a table.
Add Additional Row Insert an additional row into a column in a table.
Practical Example
Calling API to Get Phone Number and Receive Code
Example
In practical cases, using the HTTP Request node depends on the provided API. Therefore, this example is performed to help you better understand the use of this node in a specific case. The example below will use the API of the website http://ktool.site/ to rent a phone number and retrieve the code sent to that rented phone number.
- API to Get Phone Number In the request method section, you use the
GETmethod to retrieve the value. The Request URL is the provided API address to get the phone number; on this website, the address format is:http://ktool.site/api/v1/thueso/create?tokenid={your token}&quocgia={vn1 or vn2 or cam...}&dichvu={Google or Discord or Telegram....}, you can adjust the options to complete the API address, for example:http://ktool.site/api/v1/thueso/create?tokenid=65170ce2bf4d11f4acfb99f45&quocgia=cam&dichvu=Google. Since this API does not require content, you can skip the content type section, but typically, APIs have content in theapplication/jsonformat. Headers are often used to authenticate the account calling the API; in this case, you've included the API in the API address, so no additional information is needed.

After performing the query, the returned value will be in the following format:
{
    "code": 200,
    "data": {
        "amount": 850,
        "brand": "Google",
        "codeID": "65728afa50806207f8b22c6a",
        "phoneNumber": "855769145977"
    }
}
In the response section, since the requirement is to retrieve the received phone number along with the codeID to be used for OTP retrieval for this phone number, you will use the value of the data object. Therefore you fill in the Data path field with the name of the object to retrieve the value bien.
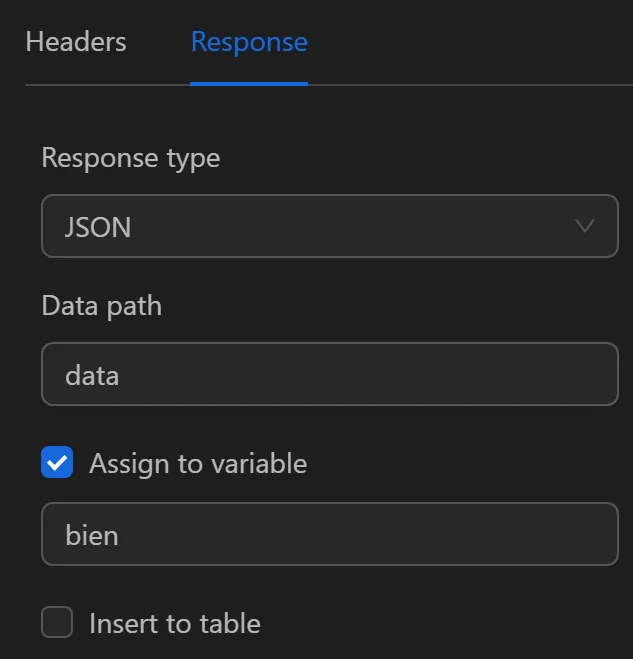
Finally, to use the retrieved data object value, you choose to assign it to a variable with the option to assign that object value to any variable. Then you can retrieve the value of codeID or phoneNumber using the expression {{variables.bien.codeID}} or {{variables.bien.phoneNumber}}.
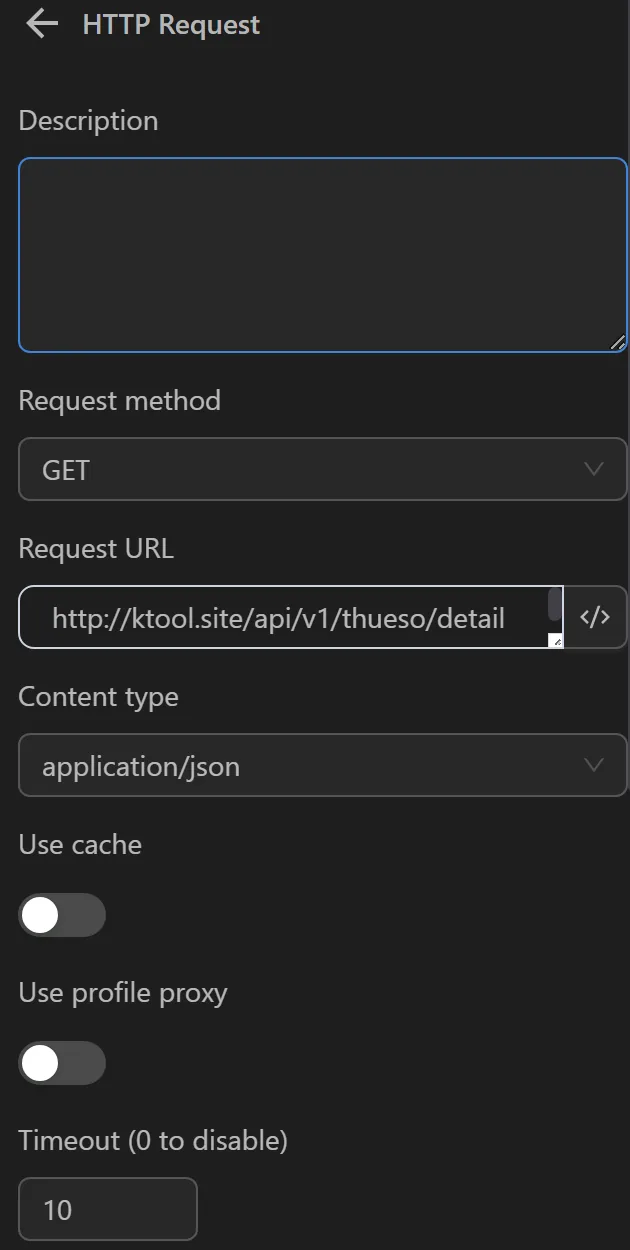
- API to Get Code for the Rented Phone Number In the request method section, you use the
GETmethod to retrieve the value. The Request URL is the provided API address to get the phone number; on this website, the address format is:http://ktool.site/api/v1/thueso/detail?tokenid={your token}&code={codeID from the phone number retrieval data}, you can adjust the options to complete the API address, for example:http://ktool.site/api/v1/thueso/detail?tokenid=65170ce2bf4d11f4acfb99f45&code={{variables.bien.codeID}}. Since this API does not require content, you can skip the content type section, but typically, APIs have content in theapplication/jsonformat. Headers are often used to authenticate the account calling the API; in this case, you've included the API in the API address, so no additional information is needed.
After performing the query, the returned value will be in the following format:
{
    "code": 200,
    "data": {
        "status": true,
        "otp": "127535",
        "id": "653103d36d2de34c3fa569d4",
        "brand": "Google"
    }
}
In the response section, since the requirement is to retrieve the received phone number along with the codeID to be used for OTP retrieval for this phone number, you will use the value of the data object. Therefore you fill in the Data path field with the name of the object to retrieve the value bien1.
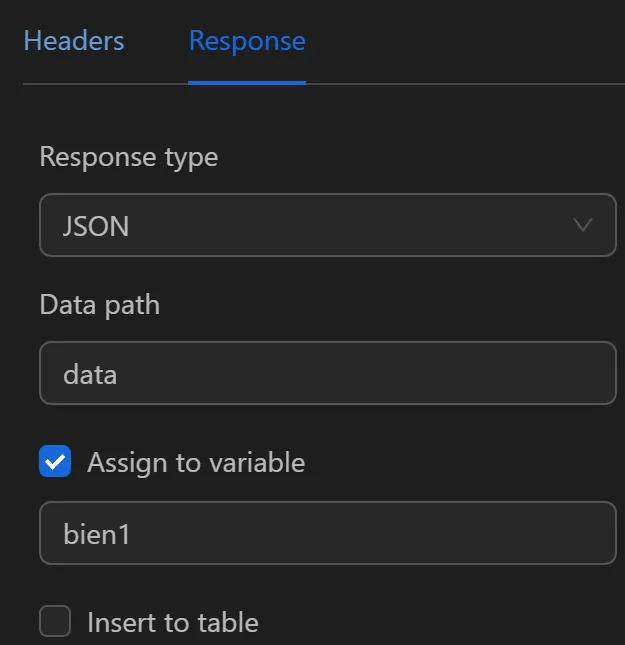
Finally, to use the retrieved data object value, you choose to assign it to a variable with the option to assign that object value to any variable.
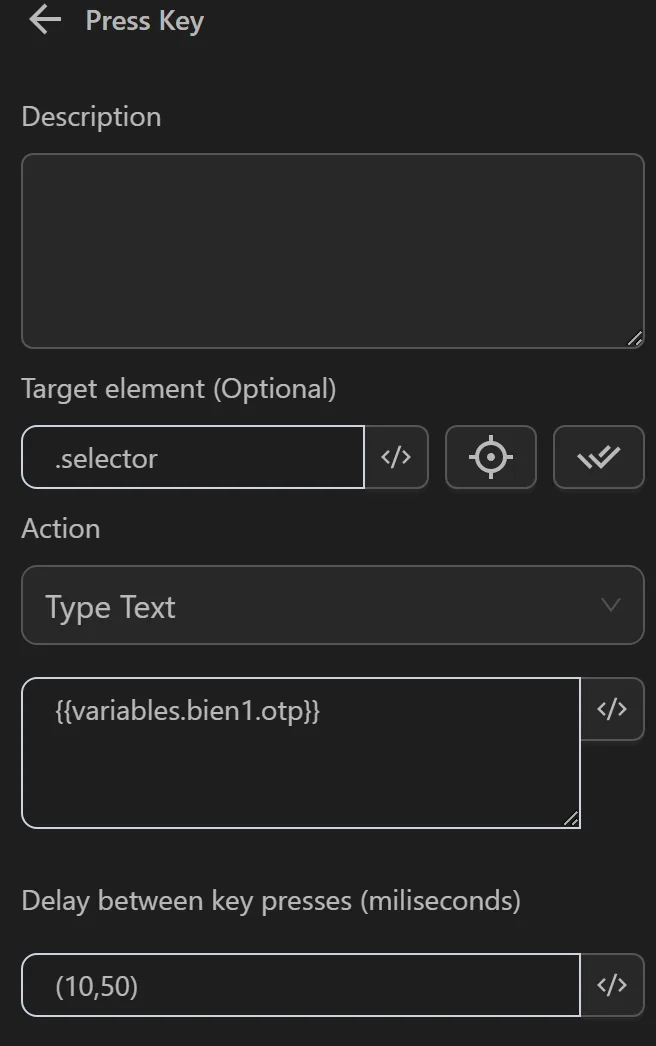
Then, you can retrieve the otp value to use in the Press Key node to fill in the code at the required position using the syntax {{variables.bien1.otp}}.
Insert Value into Google Sheet When Running a Profile
Example
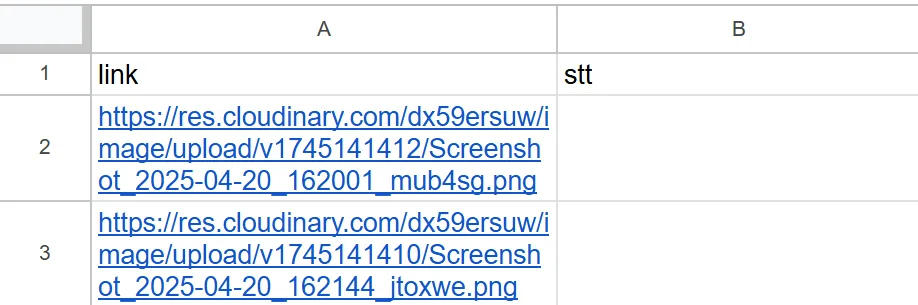
Here you want to open all the links retrieved from Google Sheets and then insert the done status in the stt column in the same row as that link's value.
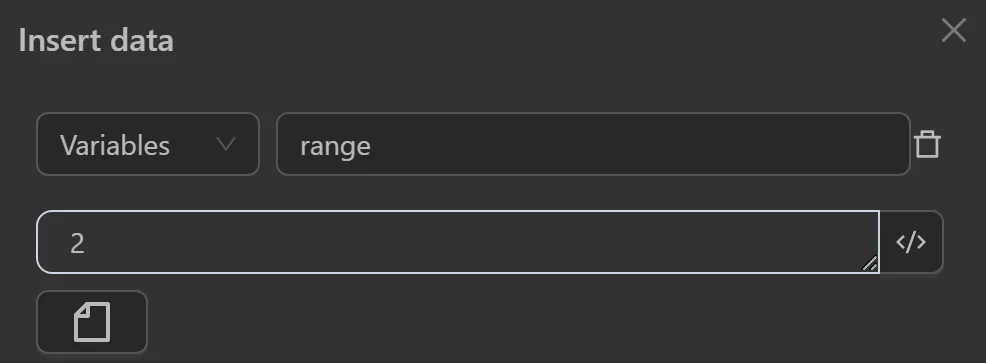
First, you will create a variable called range using the Insert Data node.
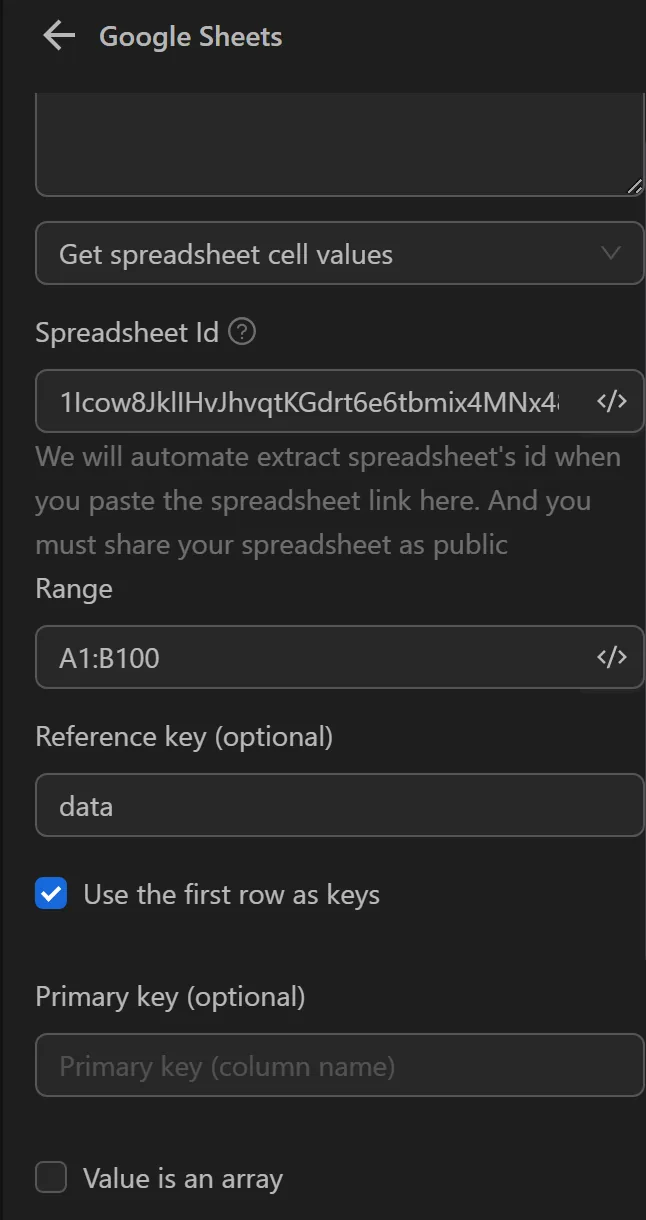
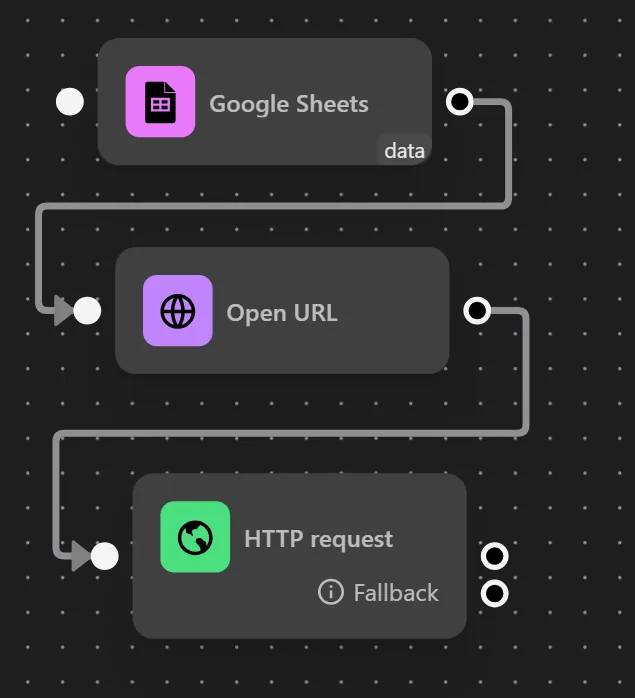
Next, configure the Google Sheets node to retrieve data from Google Sheets as follows:
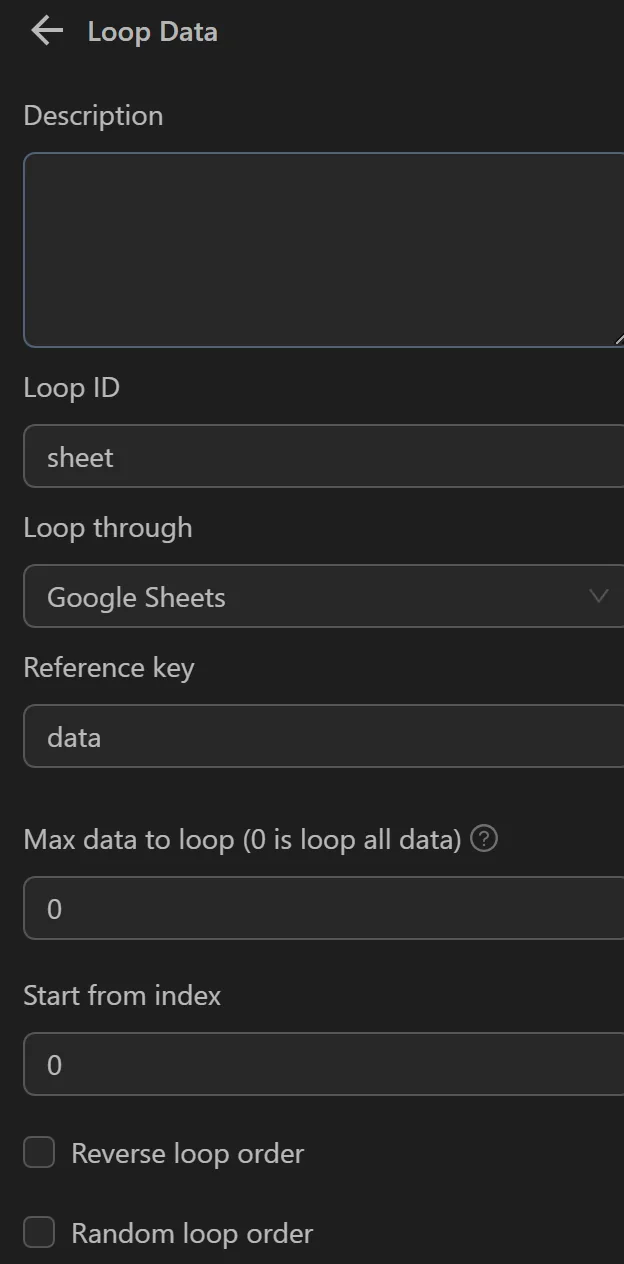
Next, configure the Loop Data node to retrieve data from the Google Sheets node.
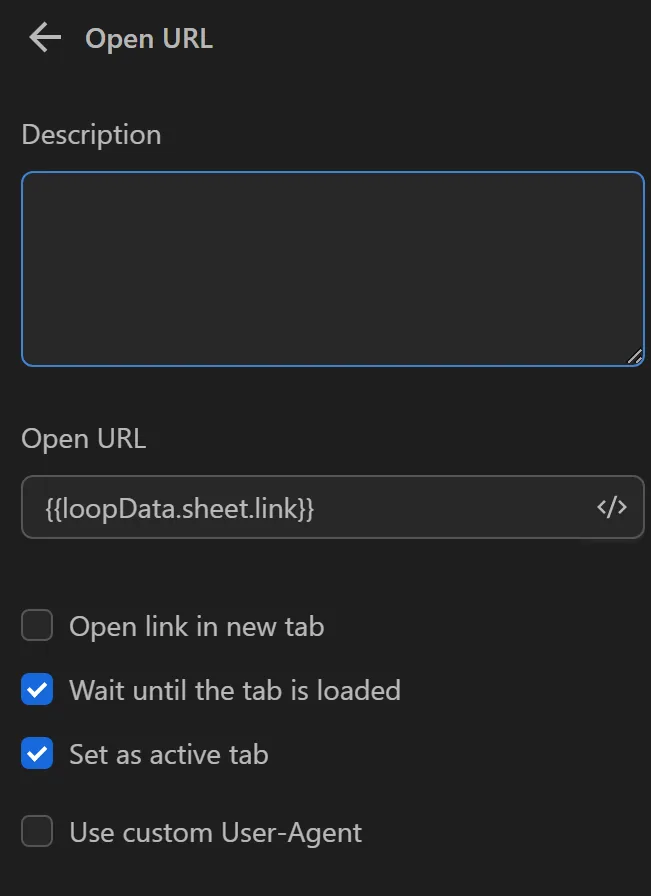
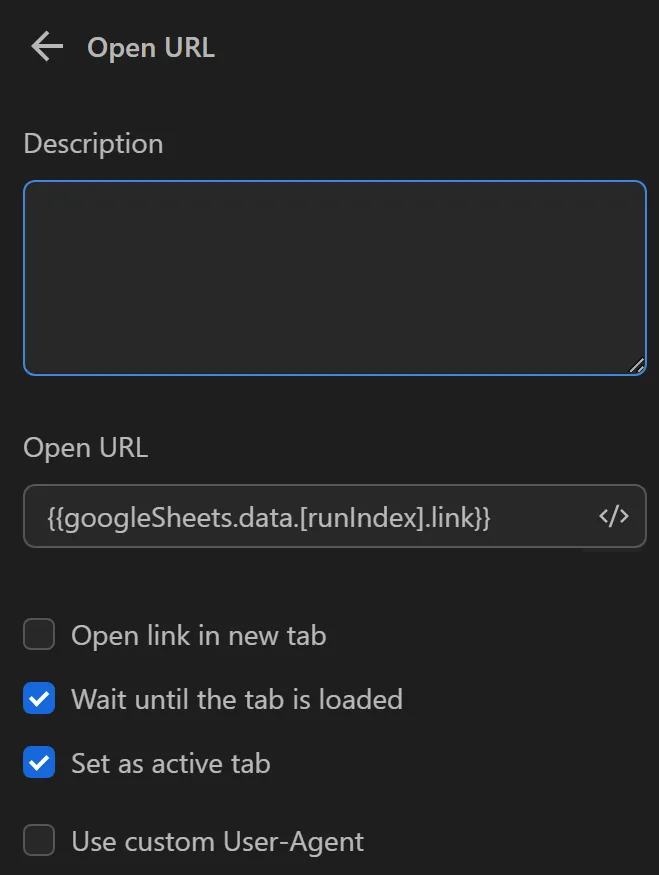
Next, configure the Open URL node to open the link in each loop using the template expression {{loopData.loopId.ten_cot_du_lieu}}, and in this script, it is {{loopData.sheet.link}}.
Next, you will configure the HTTP Request node to insert the status into the stt column. To configure the Request URL, you need to follow these steps first:
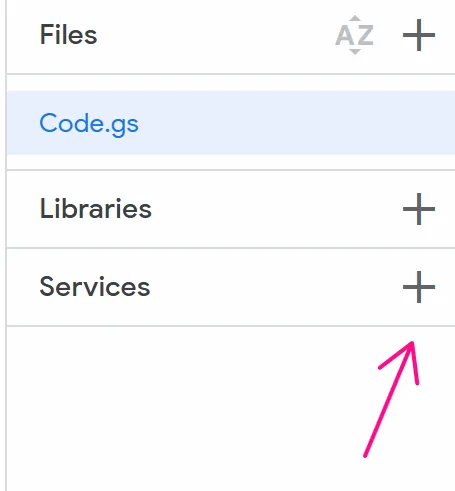
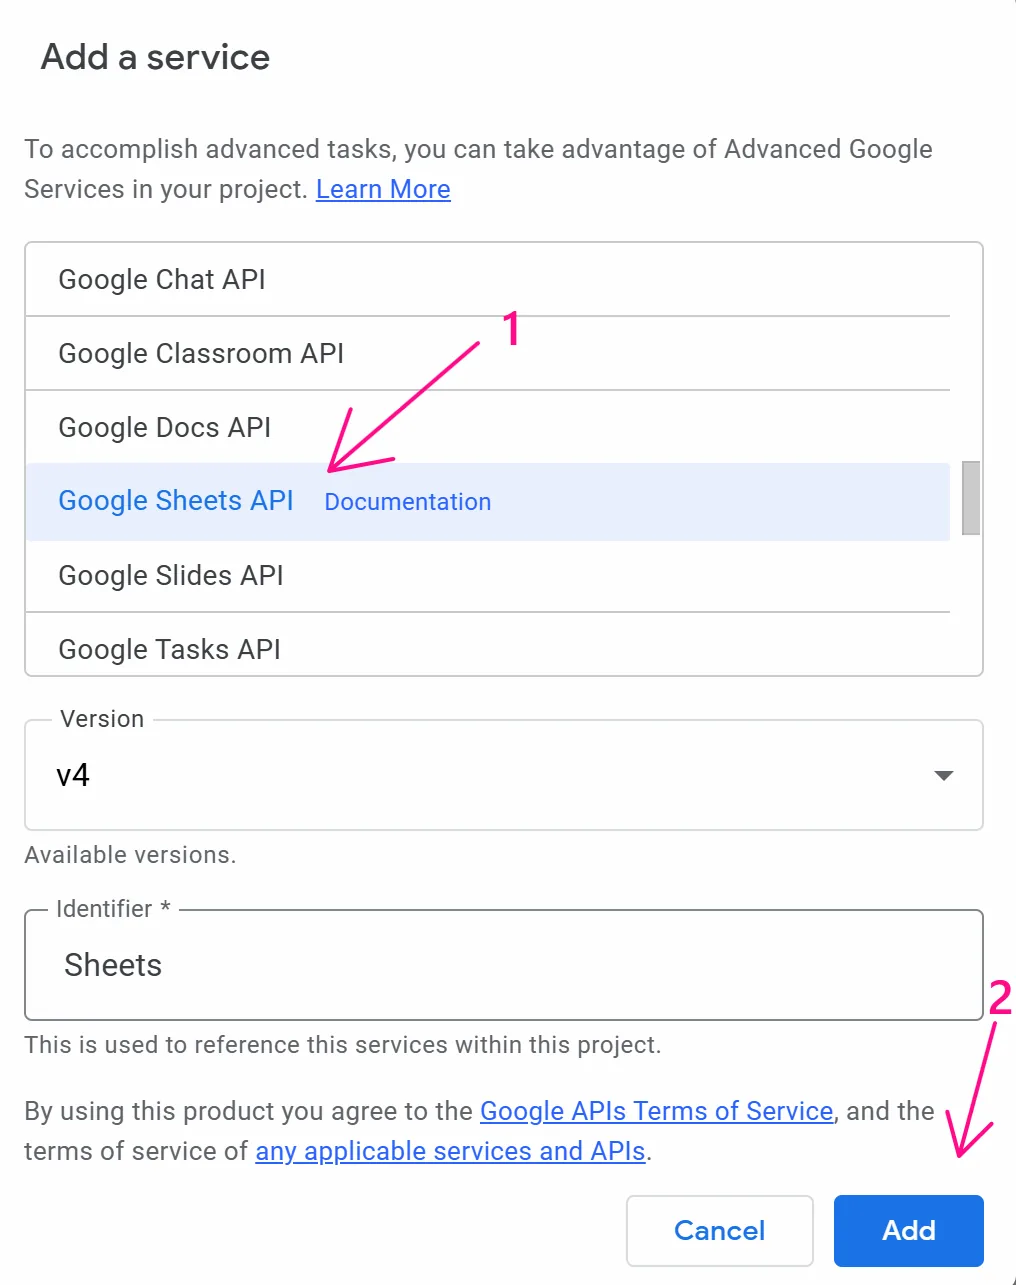
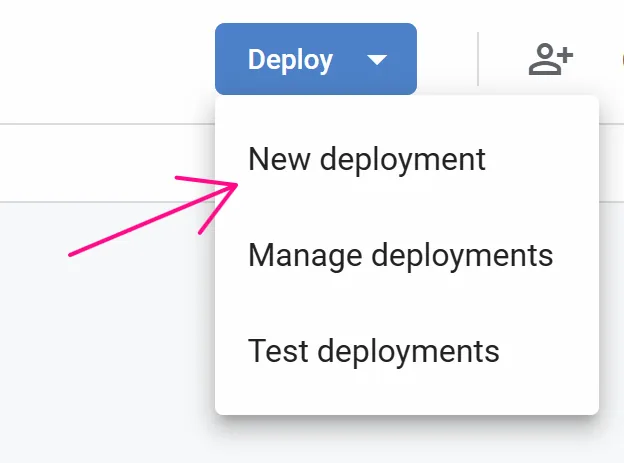
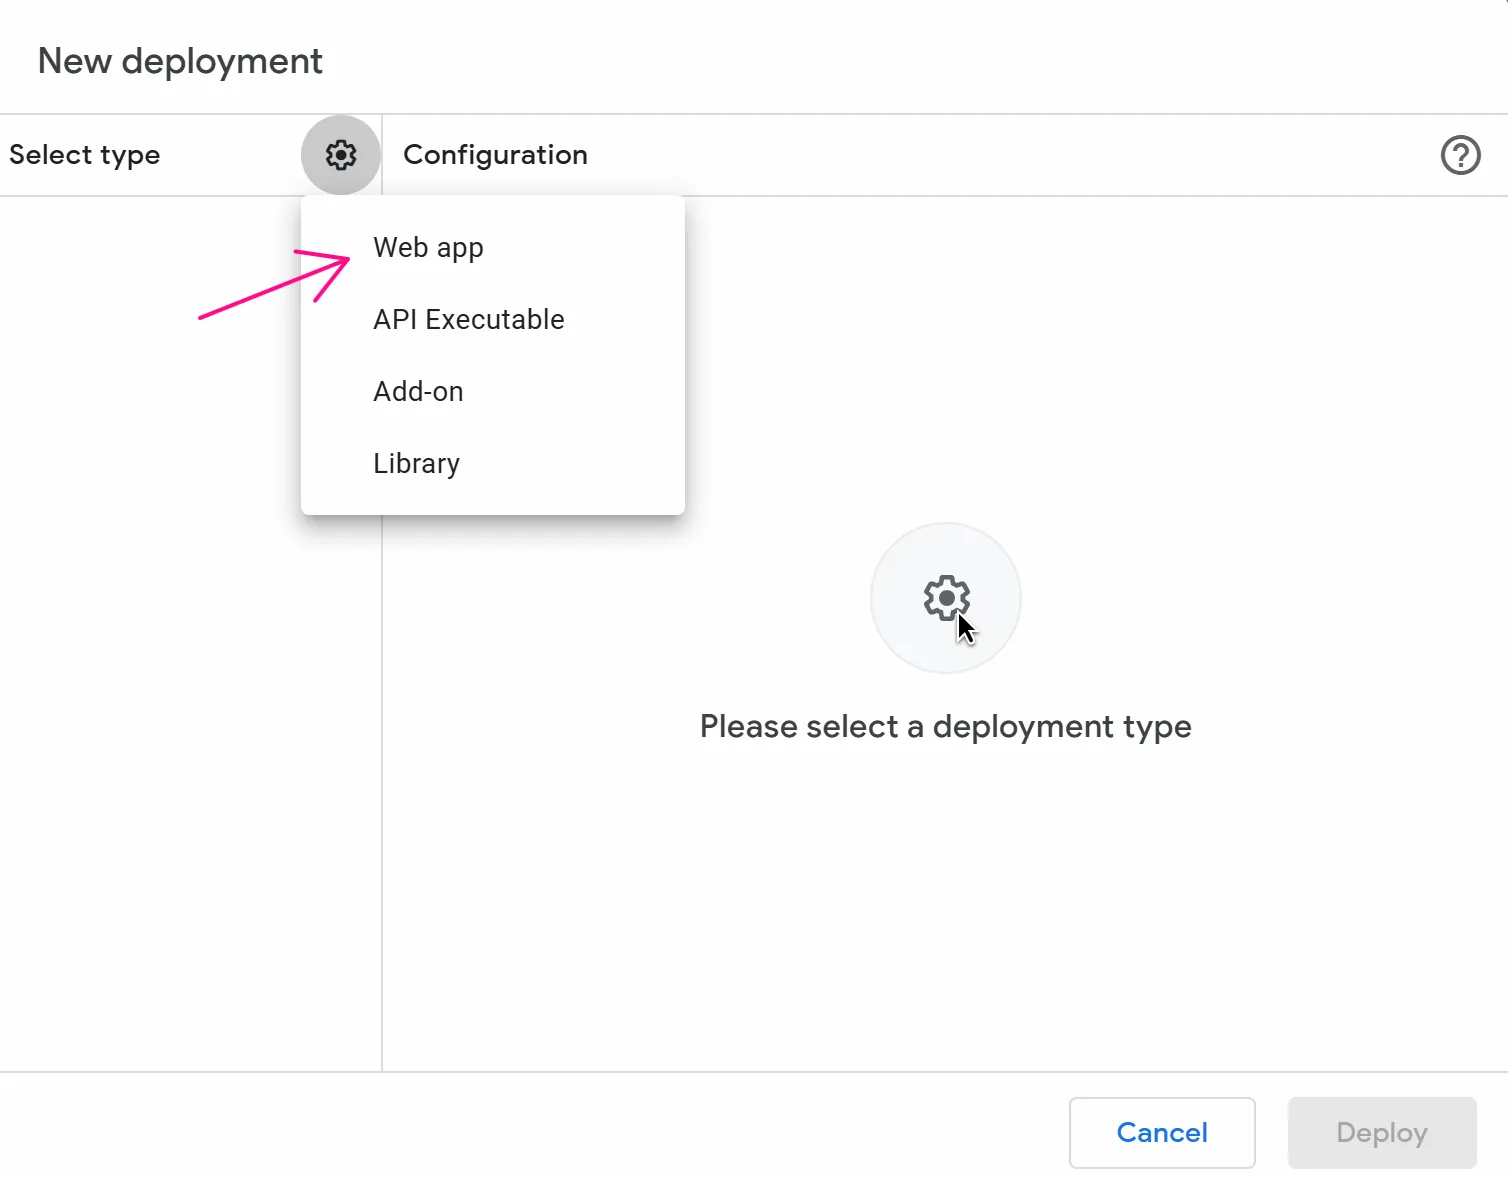
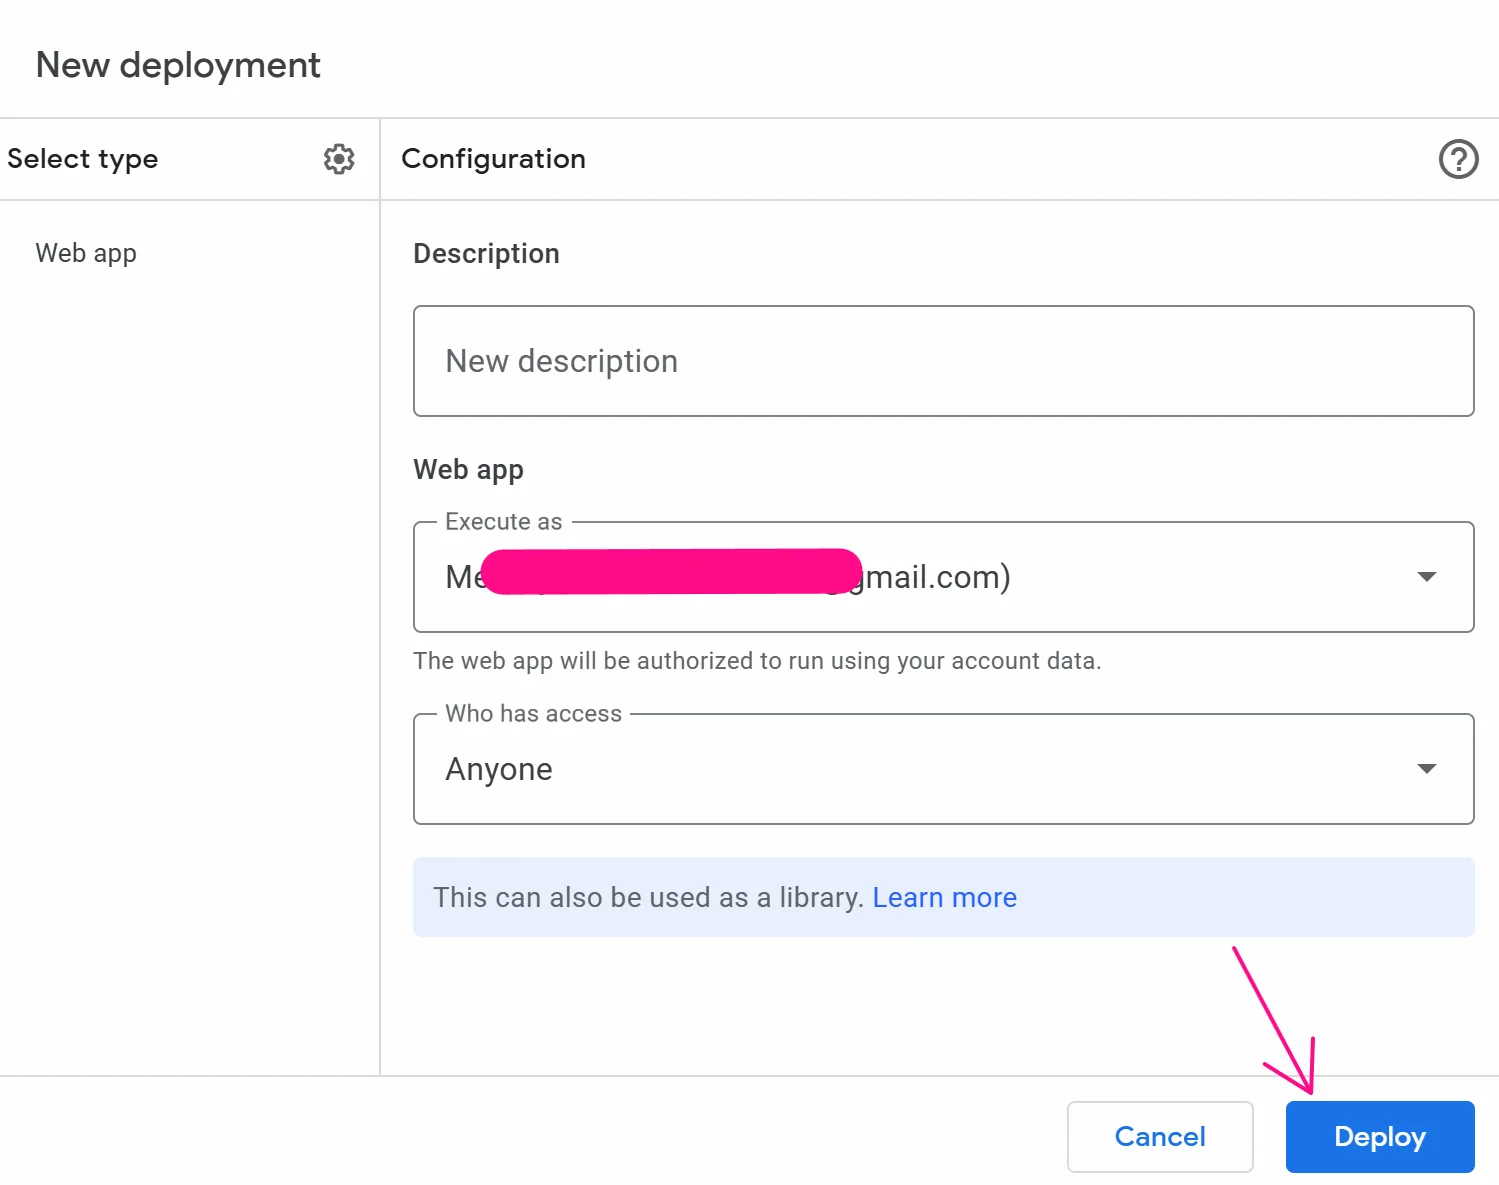
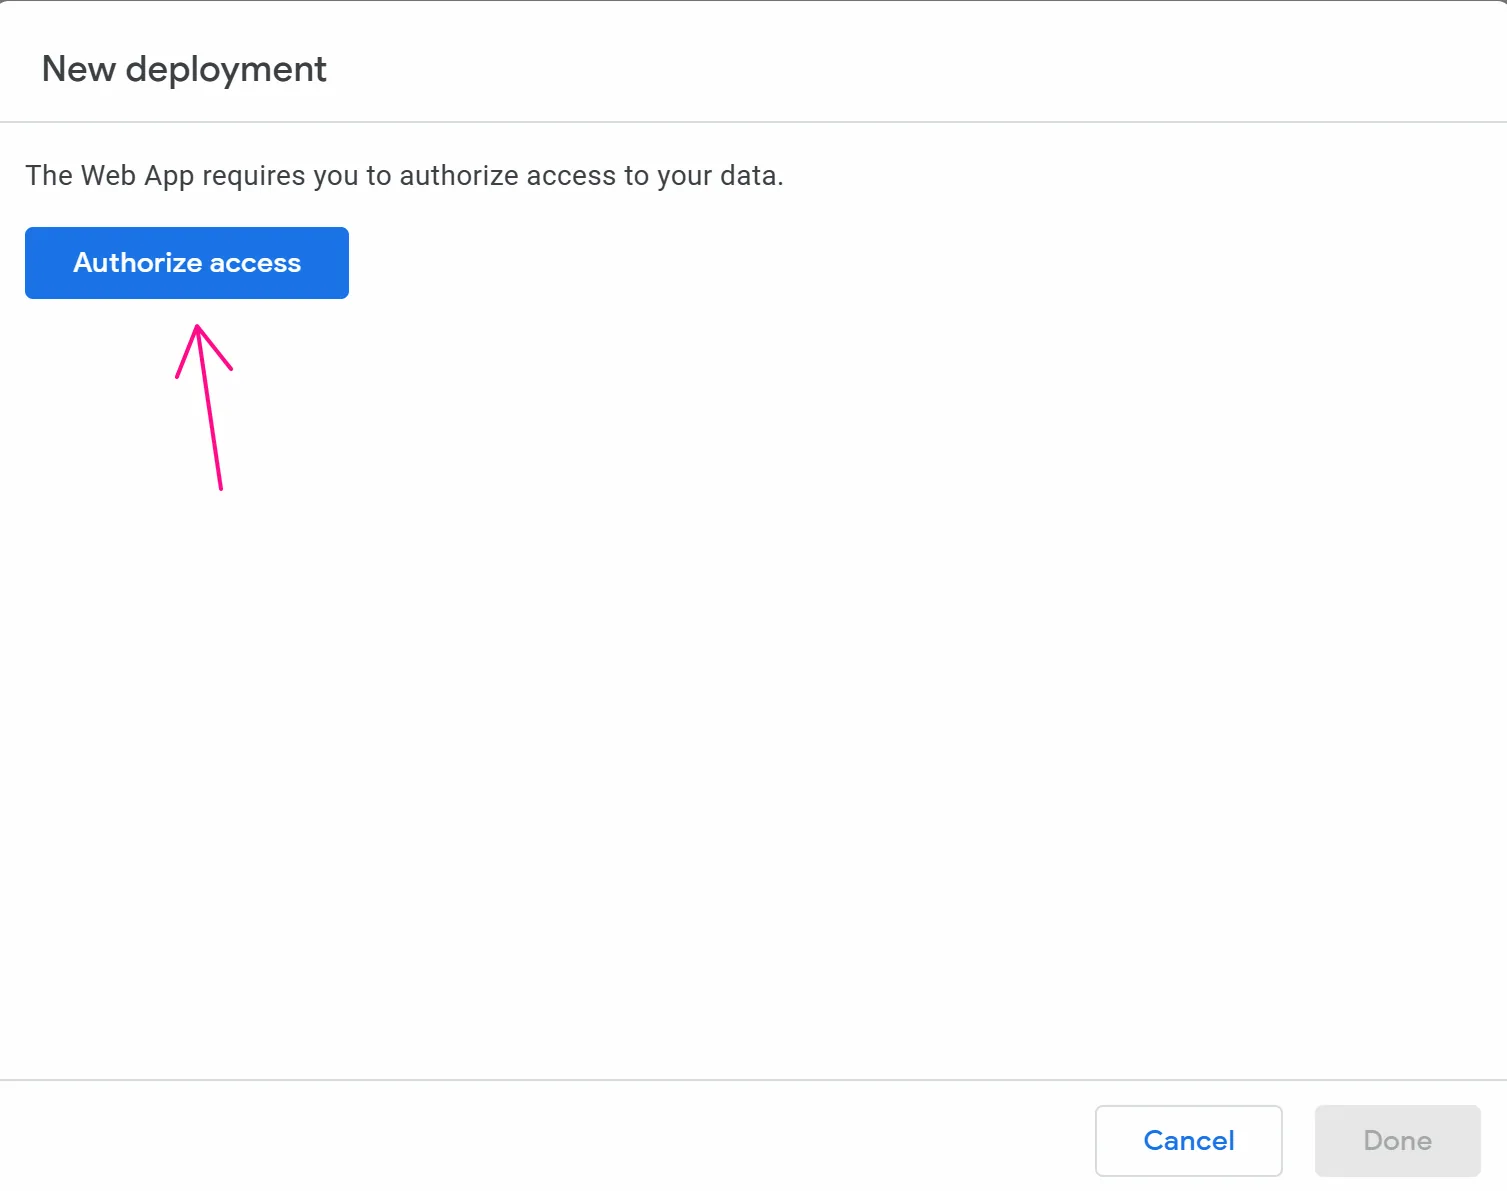
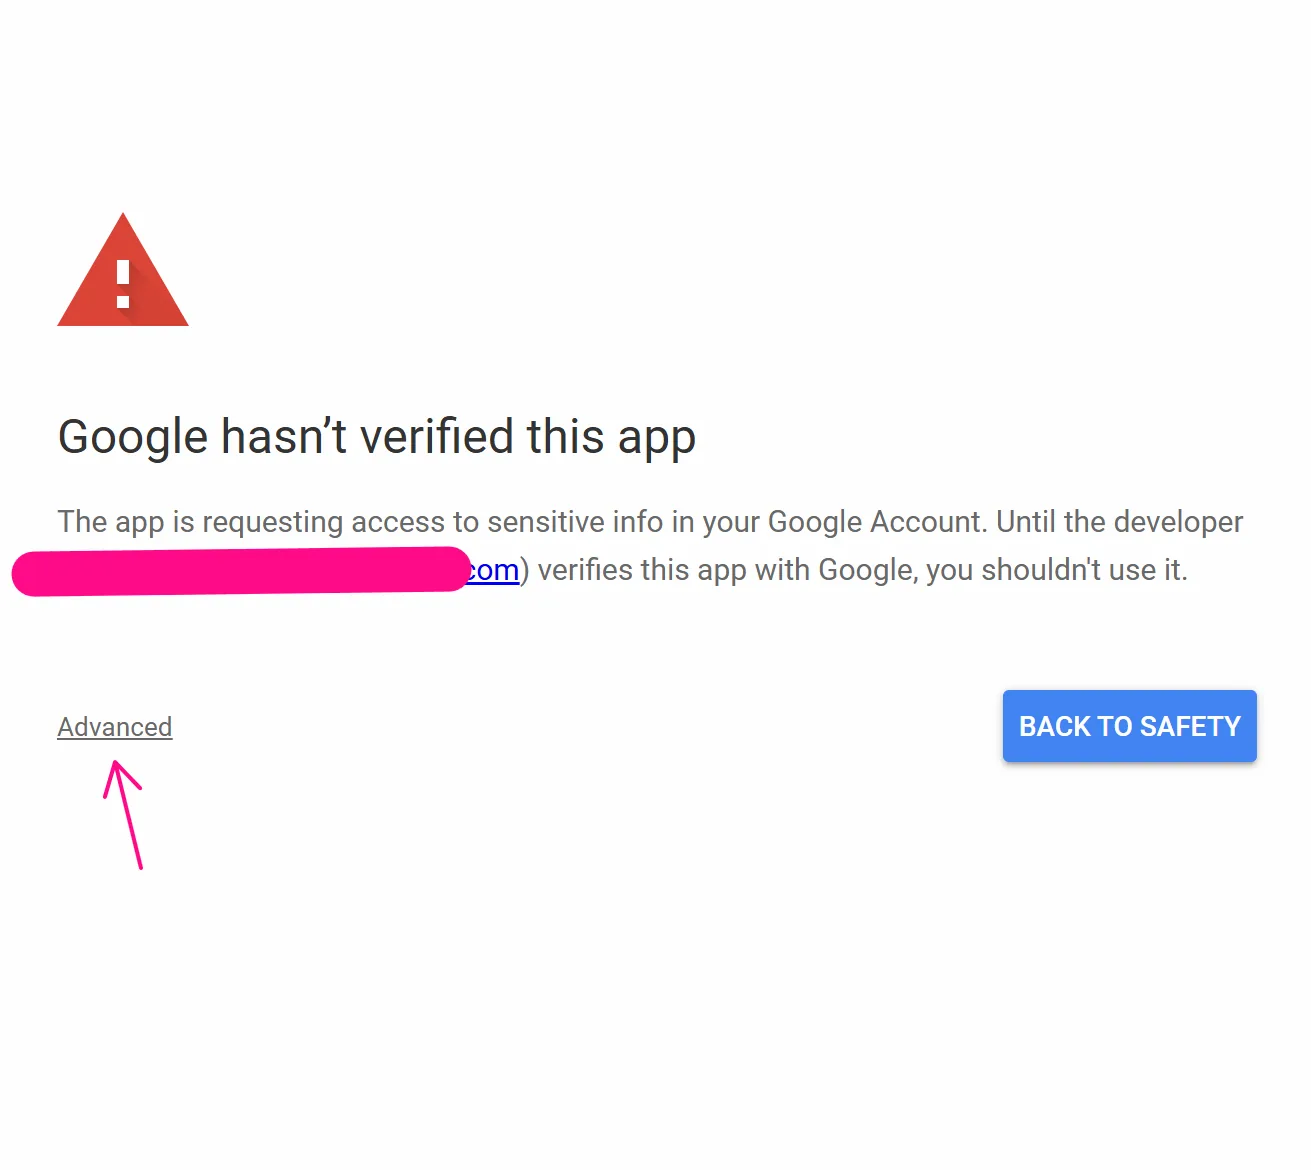
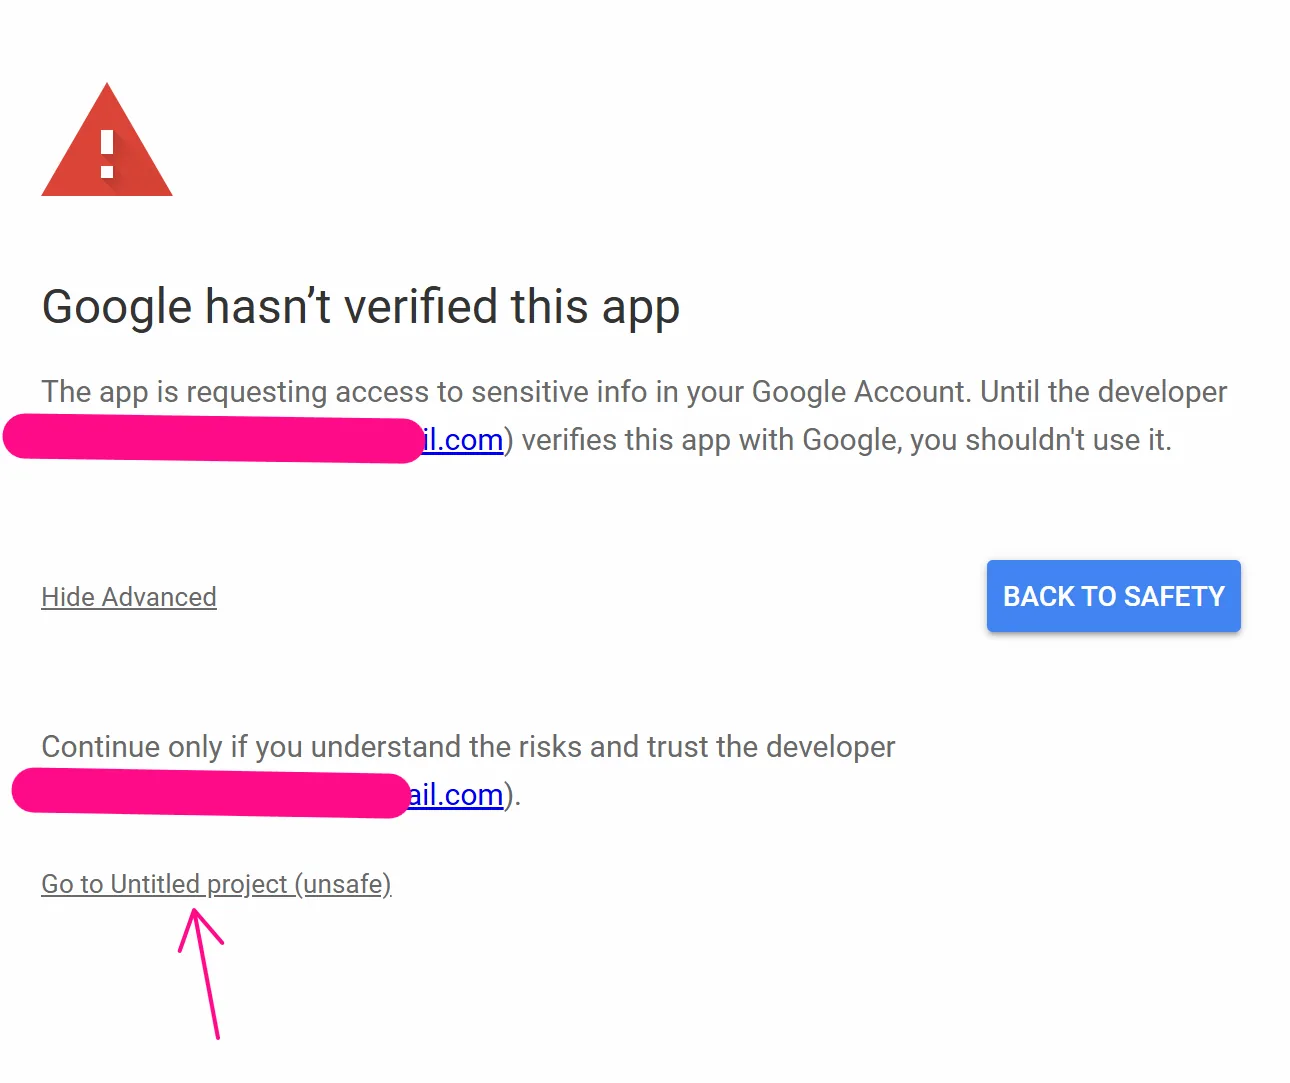
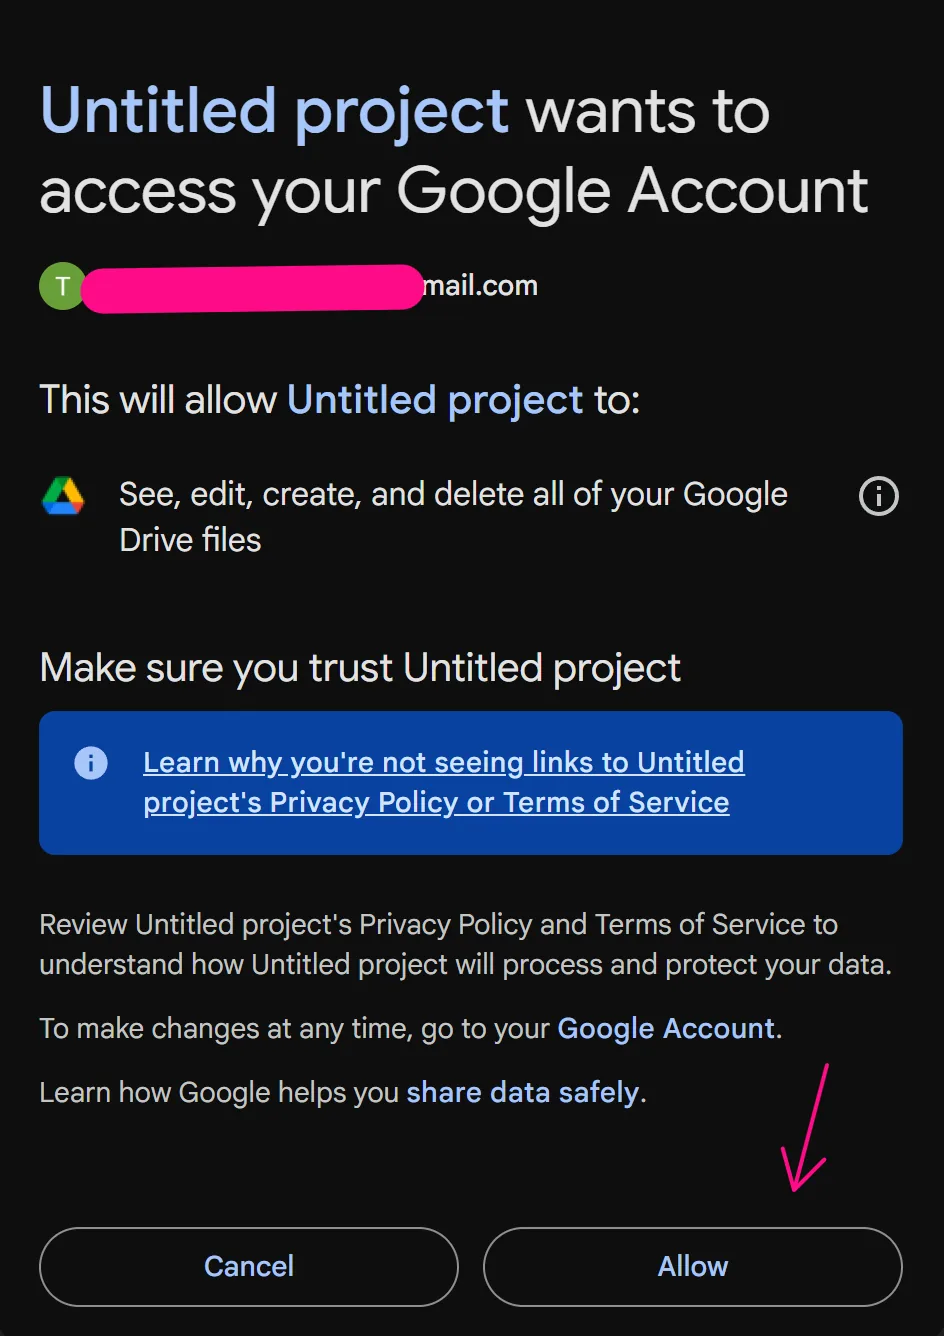
First, go to the link https://script.google.com/home and follow the steps as shown in the images:


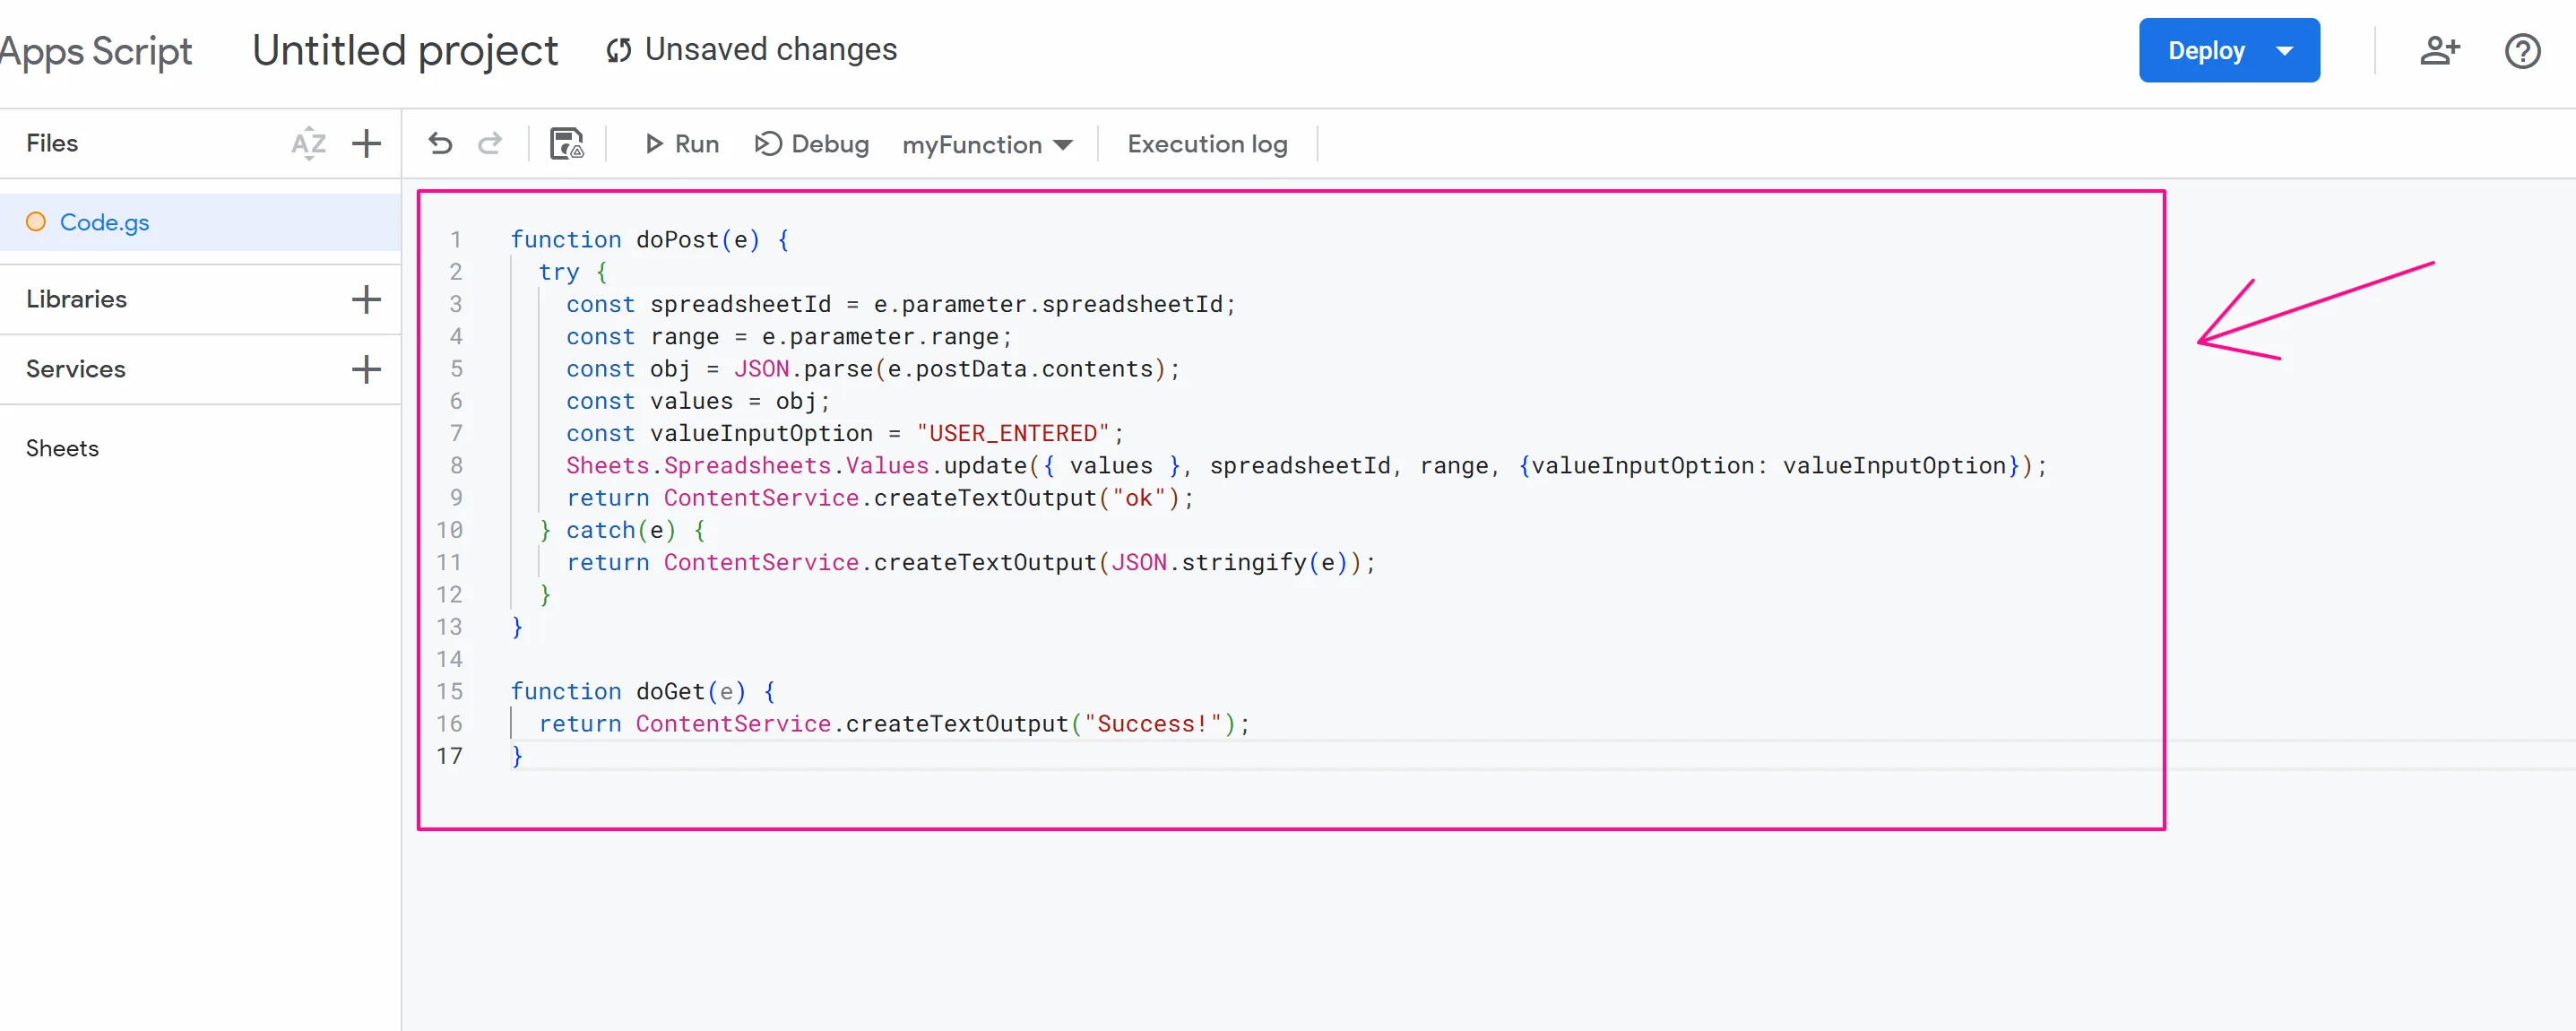
At this point, you delete the existing value and paste this code:
function doPost(e) {
  try {
    const spreadsheetId = e.parameter.spreadsheetId;
    const range = e.parameter.range;
    const obj = JSON.parse(e.postData.contents);
    const values = obj;
    const valueInputOption = "USER_ENTERED";
    Sheets.Spreadsheets.Values.update({ values }, spreadsheetId, range, {valueInputOption: valueInputOption});
    return ContentService.createTextOutput("ok");
  } catch(e) {
    return ContentService.createTextOutput(JSON.stringify(e));
  }
}

function doGet(e) {
  return ContentService.createTextOutput("Success!");
}


Finally, copy this URL value:
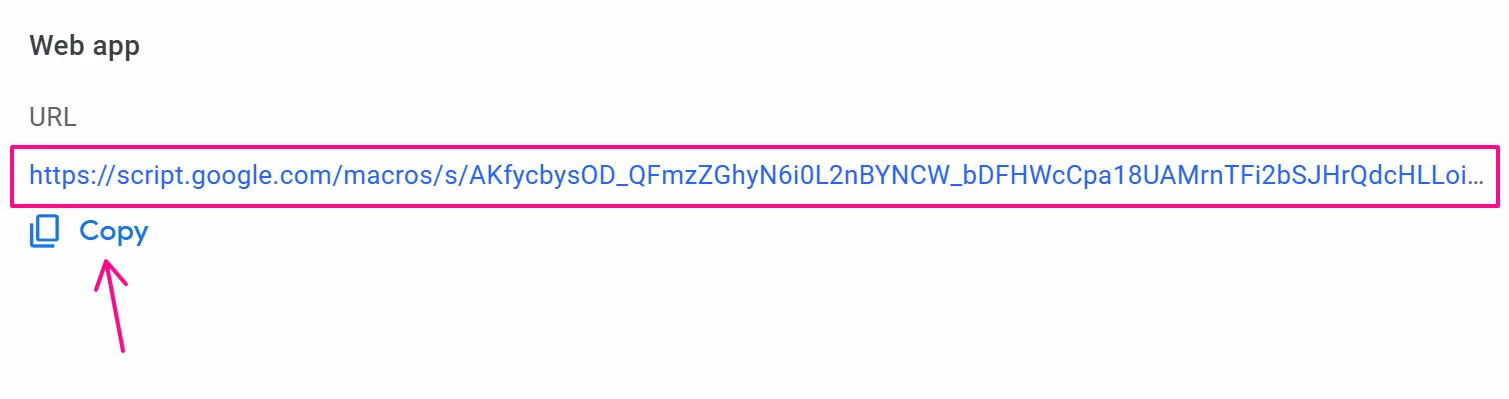
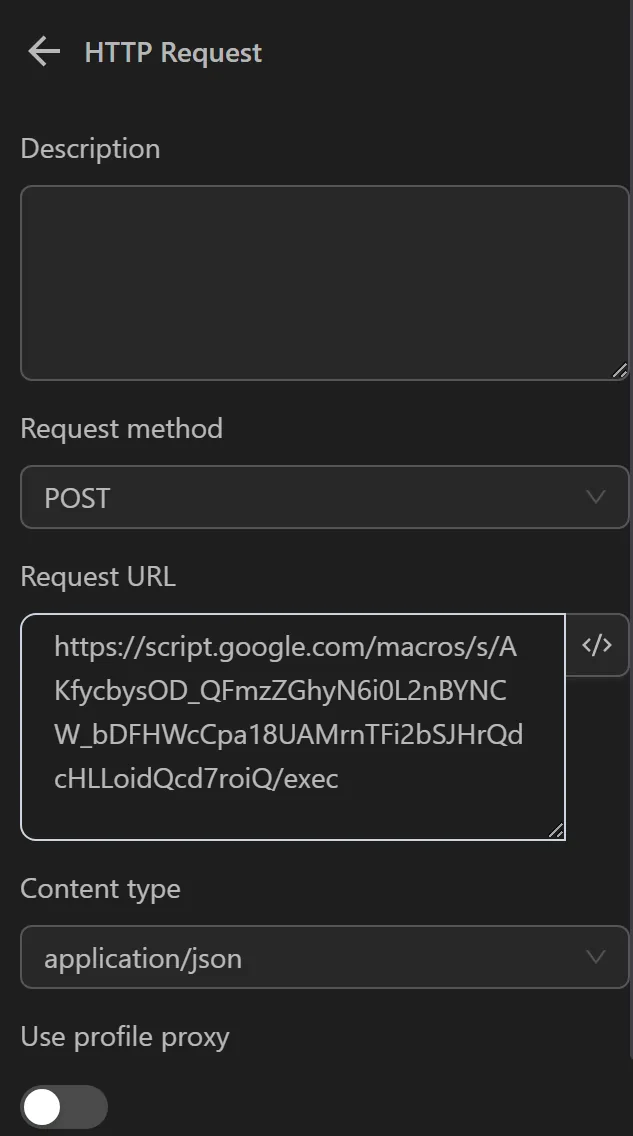
Now, you will use this URL in the HTTP Request node as follows:
In the Request URL, you will fill in according to the formula URL?googlesheetId=a&range=b, where a is the ID of the Google Sheets where you want to insert the status, and b is the cell, you want to update the value for. If there are multiple sheets like sheet1, sheet2, you can specify the range as range=sheet2!b. In this case, it would be written as: https://script.google.com/macros/s/AKfycbxw6yFtbqapqJ07J9gwyKUoGhXjc_kIehxT1HPO9ZUwCal-iw4SIjB53ahIs-WNEBXdtA/exec?spreadsheetId=1qDb4fe4dWFHfd1HIYkc8JPTd0IoYpsRVyTwfJhaZcV8&range=B{{variables.range}}.
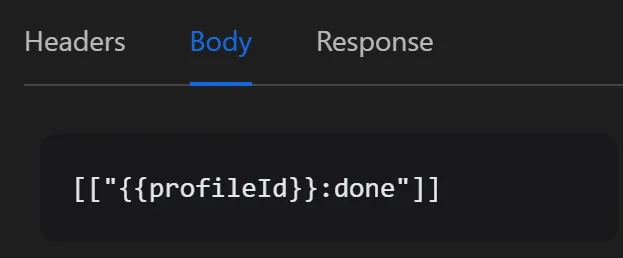
Next, in the content section, you will fill in the text you want to insert as follows. If it's a variable or a value from any expression, you can write it like this: [["{{variables.a}}"]] if you want to insert the value of variable a into the column.
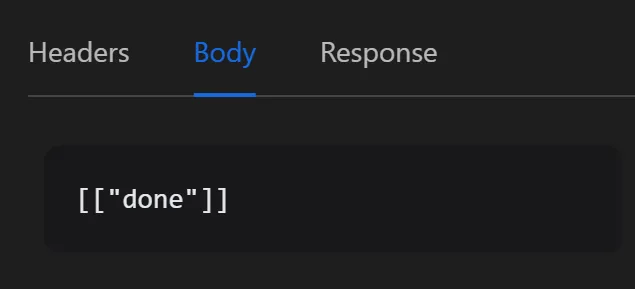
In the Response section, assign the response value to a status variable to confirm successful insertion.
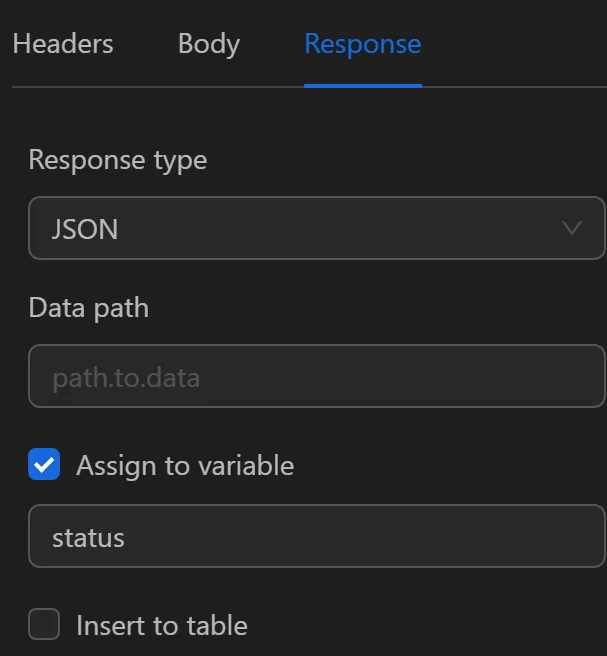
If the insertion is successful, the variable will receive the value as follows:

Next, use the Insert Data node to increment the range variable by 1 unit, so in the next loop, the inserted cell will be B3.
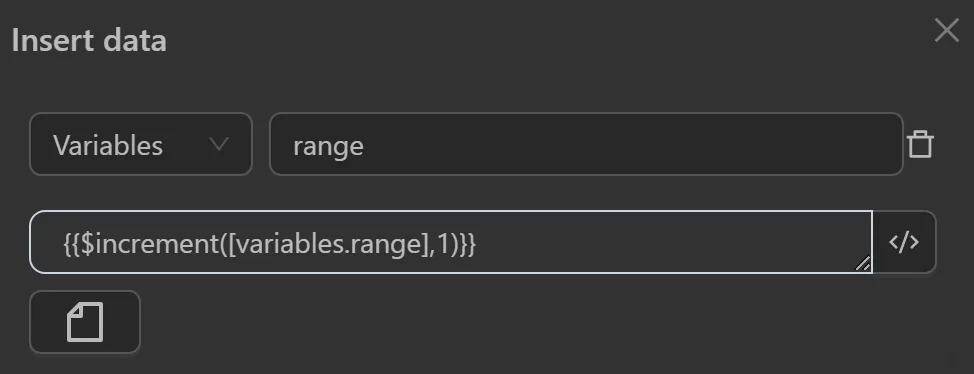
The code block will then look like this:
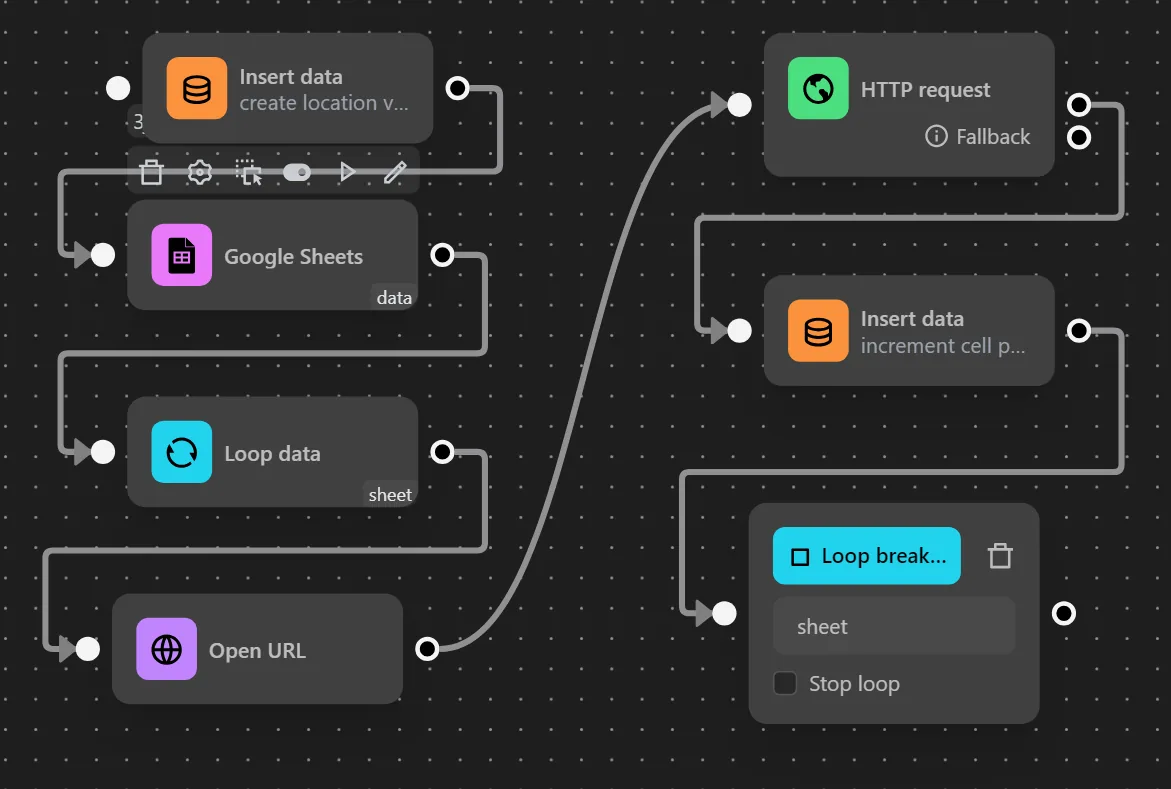
When running this code block, the done value will be updated next to each value in the link column.

Insert Value into Google Sheet When Running Multiple Profiles
Example
Here you want the script to open a link retrieved from Google Sheets and then insert the done status in the stt column in the same row as that link's value for each profile.
Next, configure the Google Sheets node to retrieve data from Google Sheets as follows:
Next, configure the Open URL node to open the link in each loop using the template expression {{googleSheets.khoa_tham_chieu.[runIndex].ten_cot}}, and in this script, it is {{googleSheets.data.[runIndex].link}}. runIndex here represents the profile order when running; for example, if two profiles run simultaneously, the first profile will have a runIndex value of 0, and the second profile will have a runIndex value of 1.
Next, you will configure the HTTP Request node to insert the status into the stt column. To configure the Request URL, you need to follow these steps first:
First, go to the link https://script.google.com/home and follow the steps as shown in the images:
At this point, you delete the existing value and paste this code:
function doPost(e) {
  try {
    const spreadsheetId = e.parameter.spreadsheetId;
    const range = e.parameter.range;
    const obj = JSON.parse(e.postData.contents);
    const values = obj;
    const valueInputOption = "USER_ENTERED";
    Sheets.Spreadsheets.Values.update({ values }, spreadsheetId, range, {valueInputOption: valueInputOption});
    return ContentService.createTextOutput("ok");
  } catch(e) {
    return ContentService.createTextOutput(JSON.stringify(e));
  }
}

function doGet(e) {
  return ContentService.createTextOutput("Success!");
}
Finally, copy this URL value:
Now, you will use this URL in the HTTP Request node as follows:
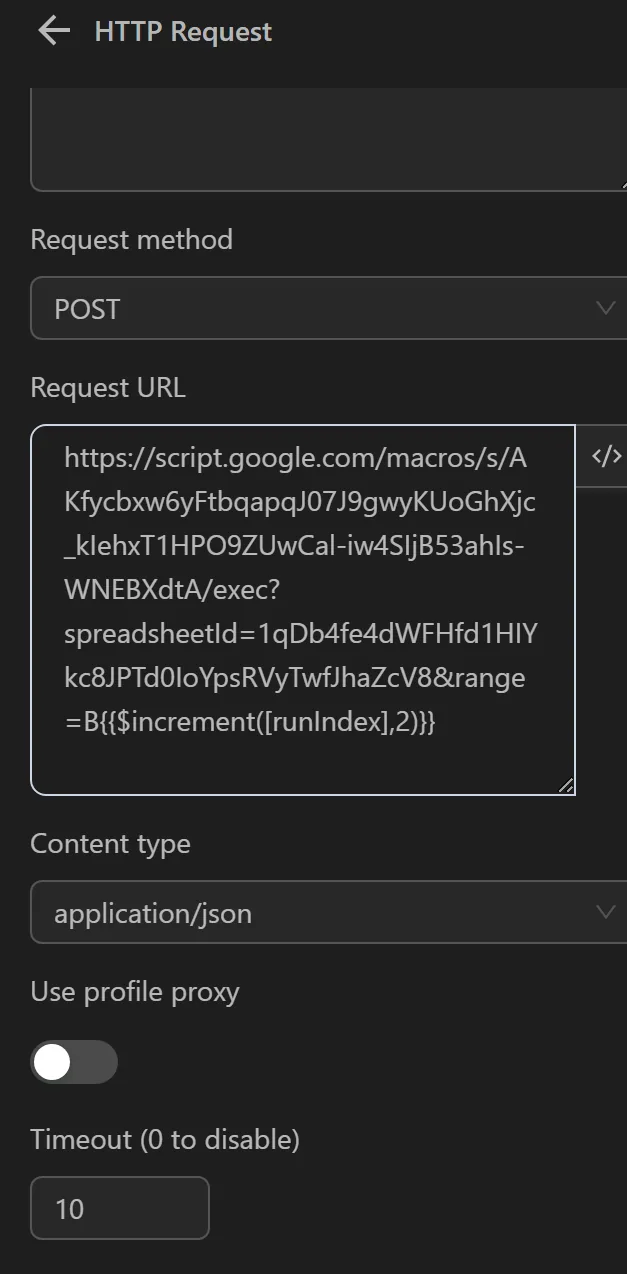
In the Request URL, you will fill in according to the formula URL?googlesheetId=a&range=b, where a is the ID of the Google Sheets where you want to insert the status, and b is the cell, you want to update the value for. If there are multiple sheets like sheet1, sheet2, you can specify the range as range=sheet2!b. In this case, it would be written as: https://script.google.com/macros/s/AKfycbxw6yFtbqapqJ07J9gwyKUoGhXjc_kIehxT1HPO9ZUwCal-iw4SIjB53ahIs-WNEBXdtA/exec?spreadsheetId=1qDb4fe4dWFHfd1HIYkc8JPTd0IoYpsRVyTwfJhaZcV8&range=B{{$increment([runIndex],2)}}.
Next, in the content section, you will fill in the text, you want to insert as follows. If it's a variable or a value from any expression, you can write it like this: [["{{variables.a}}"]] if you want to insert the value of variable a into the column.
In the Response section, you assign the response value to a variable status to determine whether the status has been inserted or not.
If the insertion is successful, the variable will receive the value as follows:
The code block will then look like this:
When running this code block, the desired value will be updated next to each value in the link column.

Retrieve Values from a Spreadsheet (Excel) for Use in an HTTP Request Node
Example
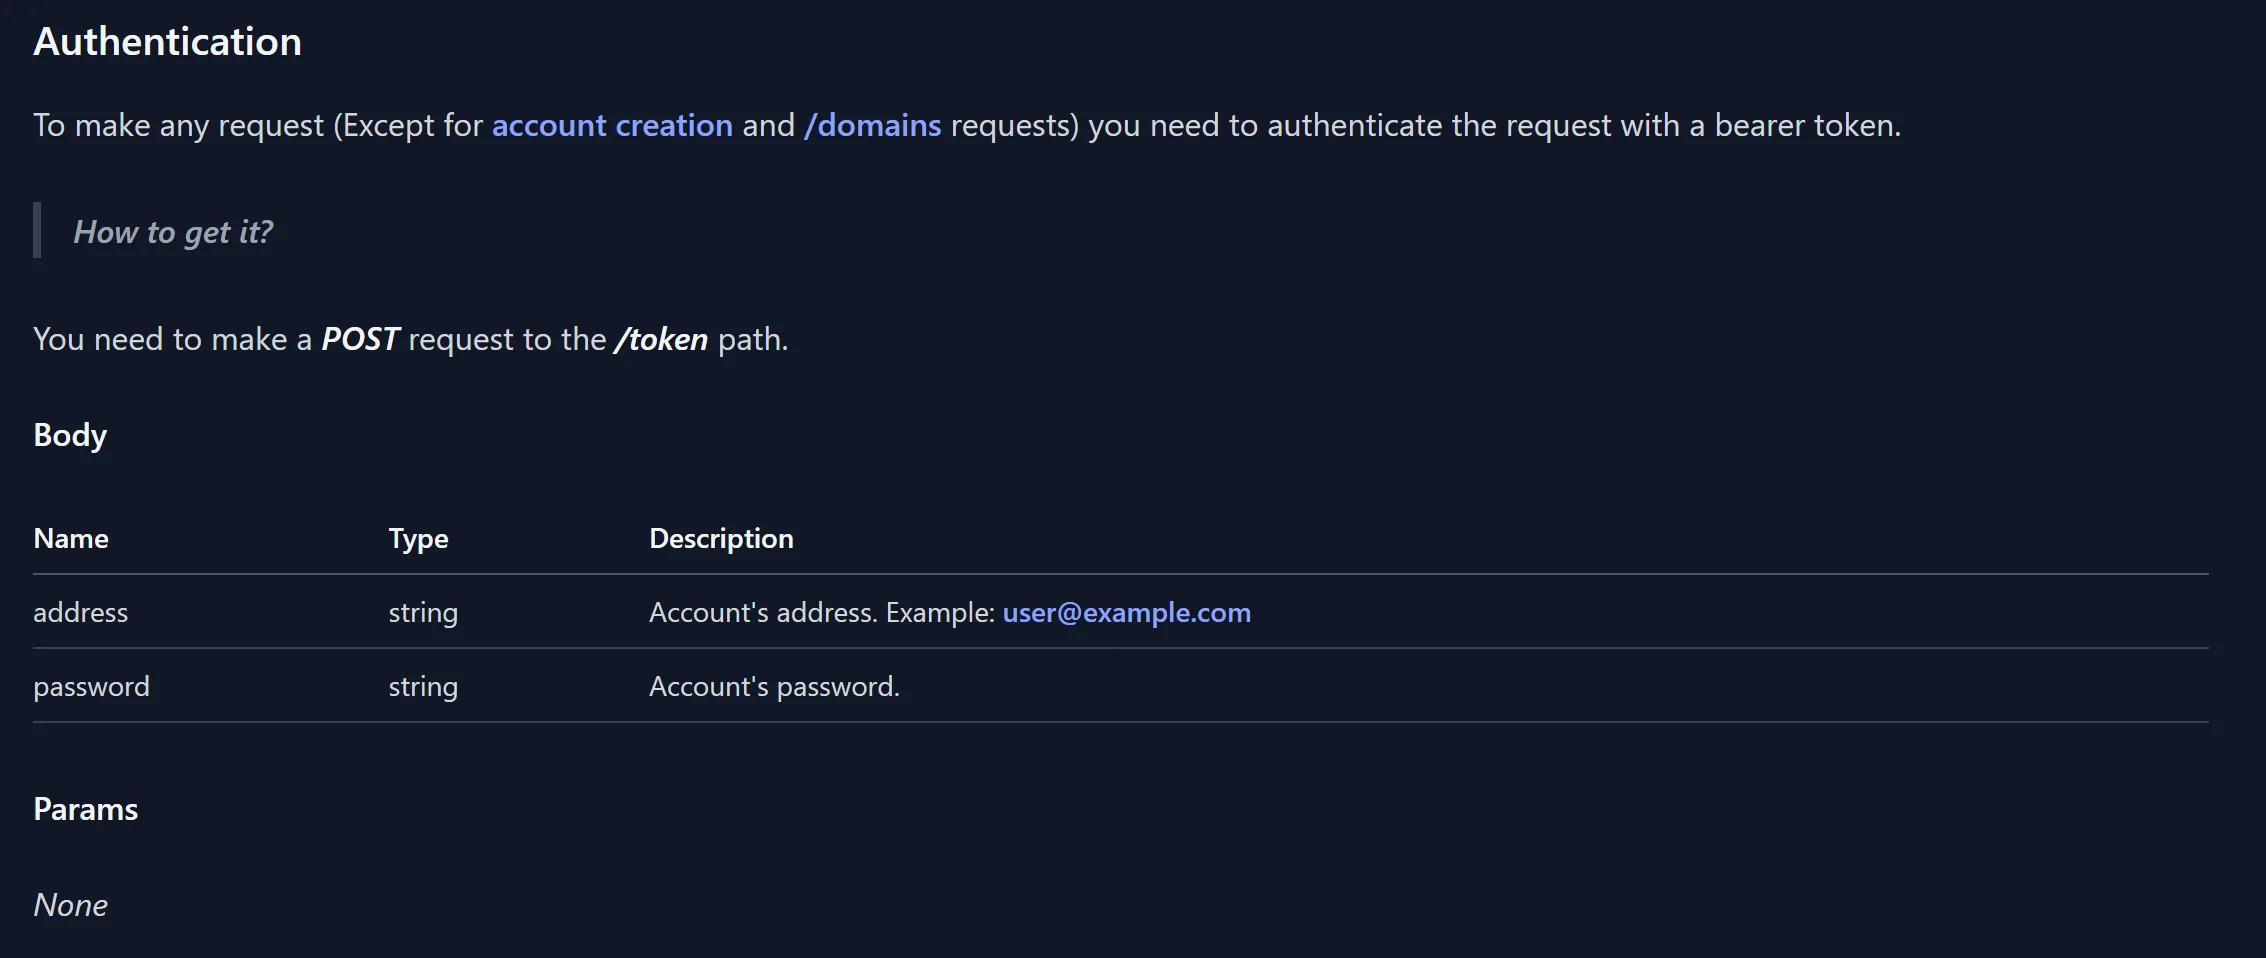
For instance, in the case of wanting to obtain a token for an account on the website https://mail.tm/vi/ to be able to perform actions via API with that account using the provided documentation
First, prepare an Excel format data file containing the email and password information of that account

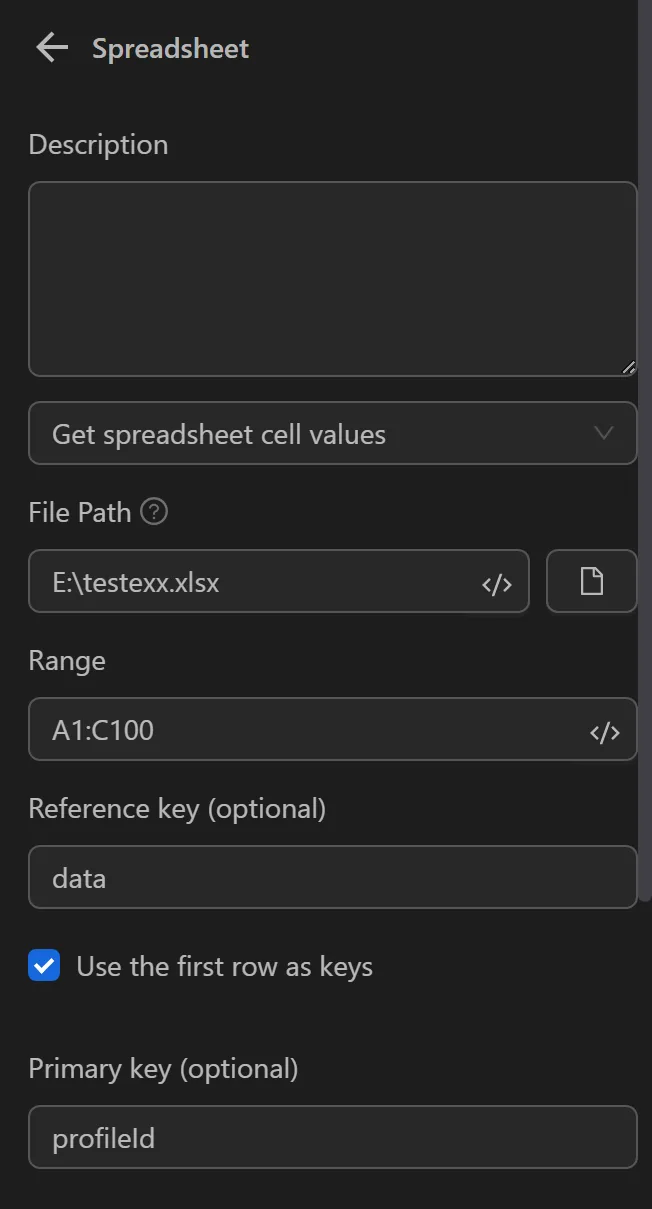
Then, configure the Spreadsheet node to extract data from the path to the provided Excel file
Next, configure the HTTP Request node to retrieve the token of the account
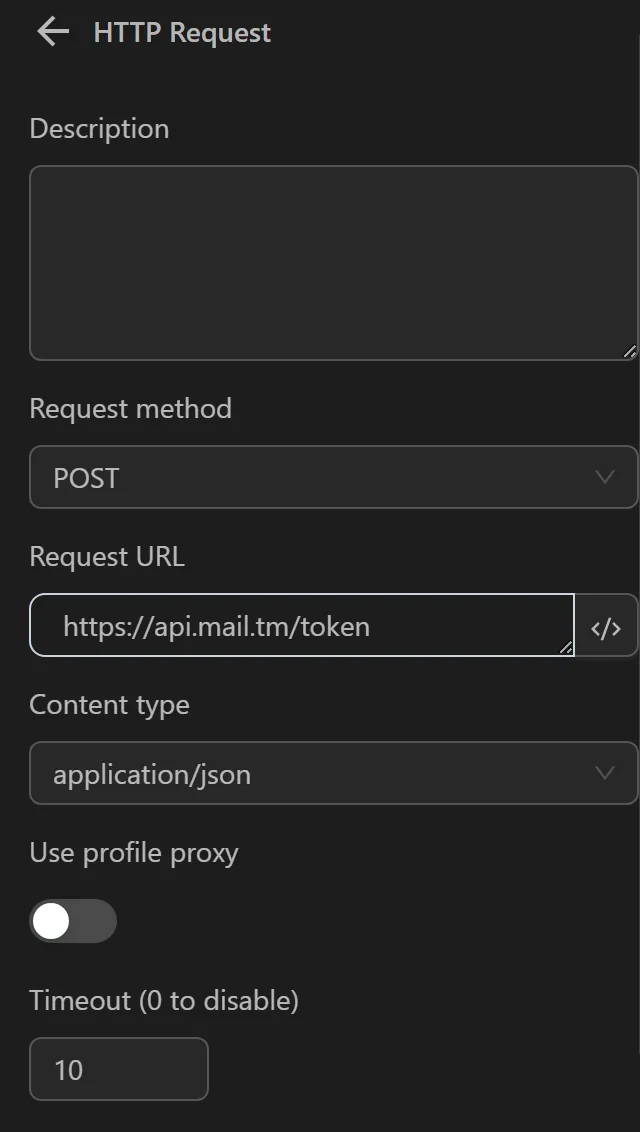

After running the two nodes Spreadsheet and HTTP Request, the returned token value will be as follows
